Jenkins Kubernetes Google Cloud
Orchestrating Google Cloud with Kubernetes
Overview
이번 실습에서는 Kubernetes Engine에서 실행되는 Jenkins를 사용하여 연속적으로 제공하는 파이프라인(pipeline)을 설정하는 방법을 배웁니다. 자세한 사항은 여기서 Jenkins on Kubernetes Engine 볼 수 있습니다.

What we’ll do
- Jenkins application을 Kubernetes 엔진 클러스터에 제공합니다.
- Jenkins application을 설정하기 위해 설정(configuration) 파일, 자격 증명(credentials), 네임 스페이스(namespace), load balancing을 사용합니다.
- Jenkins application을 연습하고 pipeline을 생성합니다.
Jenkins

Jenkins는 빌드(build), 테스트(test) 및 deployment pipeline을 유연하게 조율할 수 있는(orchestrate) 오픈 소스 자동화(automation) 서버입니다.
Continuous Delivery / Deployment?
Continuous Delivery(CD) 파이프 라인을 설정해야하는 경우, Jenkins를 Kubernetes Engine에 배포하면 표준 VM 기반 Deployment 보다 중요한 이점을 얻을 수 있습니다. 빌드(build) 프로세스에서 컨테이너(container)를 사용하는 경우 하나의 가상 호스트가 여러 운영 체제에 대해 작업을 실행할 수 있습니다. Kubernetes Engine은 임시 build executor를 제공하여 각 build가 이전 build와 동일한 깨끗한 환경에서 실행되도록합니다. build executor 의 일시적인 현상의 일부로 Kubernetes Engine 클러스터는 build가 활발하게 실행될 때만 사용되므로 일괄 처리(batch processing) 작업과 같은 다른 클러스터 작업에 리소스를 사용할 수 있습니다.
build executor가 몇 초안에 시작됩니다. Kubernetes Engine은 Google global 로드밸런서(load balancer)를 활용하여 웹 트래픽(web traffic)을 사용자의 인스턴스(instance)로 라우팅합니다. 로드밸런서는 SSL 종료를 처리하고, Google backbone 네트워크를 통해 사용자에게 가장 가까운 현재 위치에서 가장 빠른 경로 중 하나에서 사용자를 웹 프론트앤드(frontend)로 라우팅하는 글로벌 IP 주소를 제공합니다.
Provisioning Jenkins
Kubernetes 클러스터(cluster) 생성
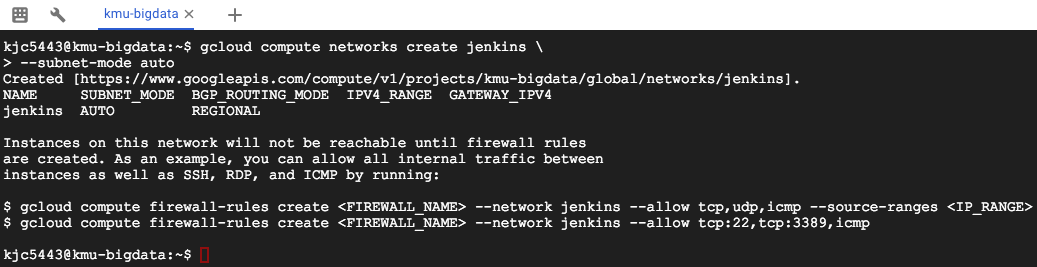
Kubernetes Engine 클러스터가 연결하여 사용할 수 있도록 Compute Engine 네트워크를 만듭니다.
$ gcloud compute networks create jenkins --subnet-mode auto
Kubernetes cluster Provision:
f1-micro로 에서 작동하면 Resource 할당 오류로 기본 Machine Type으로 진행합니다.
$ gcloud container clusters create jenkins-cd --num-nodes 5 --machine-type --network jenkins --zone us-central1-f --scopes "https://www.googleapis.com/auth/projecthosting,storage-rw"

이 단계를 완료하는 데 몇 분이 소요될 수 있습니다. Jenkins는 추가 범위를 통해 Cloud Source Repositories 및 Google Container Registry에 액세스 할 수 있습니다.
클러스터가 실행 중인지 확인하십시오.
$ gcloud container clusters list

클러스터의 자격증명(credential)을 만들어봅시다.
$ gcloud container clusters get-credentials jenkins-cd --zone us-central1-f

Kubernetes Engine 이 자격증명(credential)을 사용하여 새로 프로비저닝(provisioning)된 클러스터에 접근합니다.
클러스터에 연결할 수 있는지 확인합니다.
$ kubectl cluster-info


Jenkins 홈 볼륨(home volume) 생성
Jenkins가 Kubernetes Engine의 Jenkins에서 설명한 설정(configurations)으로 Jenkins를 미리 준비하기 위해 제공된 tarball에서 Volume 을 생성합니다.
$ gcloud compute images create jenkins-home-image --source-uri https://storage.googleapis.com/solutions-public-assets/jenkins-cd/jenkins-home-v3.tar.gz

$ gcloud compute disks create jenkins-home --image jenkins-home-image --zone us-central1-f

Kubernetes Engine은 이 volume을 Jenkins pod에 마운트(mount)합니다. 이 단계는 완료하는데 5-10분이 소요됩니다.
Github Clone Repository
Zone을 설정한 다음 Github에 있는 저장소(Repository)를 Cloud Shell에서 복사(clone)합니다. Jenkins를 배포하는 데 사용할 Kubernetes manifests가 포함되어 있습니다. manifests와 설정은 Kubernetes Engine용 Jenkins 설정(configuring)에서 설명합니다.
$ gcloud config set compute/zone us-central1-f
$ git clone https://github.com/GoogleCloudPlatform/continuous-deployment-on-kubernetes.git
$ cd continuous-deployment-on-kubernetes

Jenkins 자격증명(Credentials) 설정
다음 명령을 실행하여 랜덤 암호를 생성하고, options 파일을 업데이트합니다.
$ export PASSWORD=`openssl rand -base64 15`; echo "Your password is $PASSWORD"; sed -i.bak s#CHANGE_ME#$PASSWORD# jenkins/k8s/options
$ cat jenkins/k8s/options

다음 출력은 [PASSWORD_STRING]에 암호가 들어 있음을 표시합니다.
비밀번호는 [PASSWORD_STRING]입니다.
Jenkins를 위한 Kubernetes namespace를 생성합니다.
$ kubectl create ns jenkins

Namespace를 사용하면 리소스(Resource)에 고유한 이름을 지정하지 않고도 여러 환경에서 동일한 자원(resource) manifests를 사용할 수 있습니다.
Kubernetes secret를 생성합니다.
$ kubectl create secret generic jenkins --from-file=jenkins/k8s/options --namespace=jenkins

Kubernetes는 이 객체를 사용하여 Jenkins가 부팅할 때 Jenkins에 기본 사용자 이름과 암호를 제공합니다.
Deploy Jenkins
이 섹션에서는 샘플 코드의 jenkins/k8s 폴더에 정의된 Kubernetes 자원(resource)를 기반으로 Jenkins Deployment 및 Service를 생성합니다.
kubectl apply : Jenkins를 실행하기 위한 컨테이너(container)와 Jenkins 홈 디렉터리(home directory)가 포함된 영구적 디스크(persistent disk)가 있는 Jenkins Deployment를 생성합니다. 영구적 디스크에 홈 디렉터리를 유지하면 Jenkins Master를 실행하는 Pod가 다운된 경우에도 중요한 설정(configuration) data가 유지됩니다.
kubectl apply : 클러스터의 다른 Pod에서 Jenkins Master에 액세스할 수 있게 하는 두 가지 service를 생성합니다.
- Nodeport service 포트 8080는 Pods 그리고 외부 사용자로부터 Jenkins 사용자 인터페이스에 액세스할 수 있게 해줍니다. 이 유형의 서비스는 HTTP 로드밸런서(Load Balancer)에 의해 로드 밸런싱됩니다.
- Cluster IP service 포트 50000은 Jenkins 사용자가 클러스터 내에서 Jenkins 마스터와 통신하는데 사용합니다.
Jenkins Deployment와 Service를 생성해봅시다.
$ kubectl apply -f jenkins/k8s/

pod의 상태(status)가 running인지 확인하기 위해 watch 명령어를 사용합니다.
$ watch -n 0.5 kubectl get pods -n jenkins


Machine-Type을 f1-micro로 진행시 Pod 할당에서 Schedulable 에러가 발생합니다.

No nodes are available that match all of the predicates: Insufficient cpu (2), Insufficient memory (5).
Machine type을 n1-standard-1으로 진행합시다.
Configuring HTTP load balancing
다음으로 Jenkins 사용자 인터페이스 서비스의 외부로드 균형 조정을 관리하는 ingress resource 를 만듭니다. ingress resource는 사용자와 Jenkins 사용자 인터페이스 서비스 간의 통신을 암호화(encrypt)하는 SSL terminator 역할을 합니다.
Jenkins 네임 스페이스에 서비스를 나열하여 서비스가 올바르게 설정되었는지 확인합니다.
$ kubectl get svc -n jenkins

jenkins-discovery와 jenkins-ui가 표시되는지 확인합니다.
SSL 인증서(certificate) 그리고 키(Key)를 생성합니다.
$ openssl req -x509 -nodes -days 365 -newkey rsa:2048 -keyout /tmp/tls.key -out /tmp/tls.crt -subj "/CN=jenkins/O=jenkins"

secret으로 Kubernetes로 인증서를 업로드합니다.
$ kubectl create secret generic tls --from-file=/tmp/tls.crt --from-file=/tmp/tls.key -n jenkins

ingress를 사용하는 HTTPS load balancer를 생성합니다.
$ kubectl apply -f jenkins/k8s/lb/ingress.yaml

Jenkins 연결하기
로드밸런서(Load Balancer) health 검사 상태를 확인합니다. 정상 상태로 완료될 때까지 백엔드(backend) field가 UNKNOWN, UNHEALTHY로 표시됩니다. 다음의 명령어를 반복하여 실행하여 HEALTHY로 표시될 때까지 기다립니다.
로드밸런서를 프로비저닝하고 상태 검사를 완료하는데 몇 분이 걸릴 수 있습니다.
$ watch -n 1 kubectl describe ingress jenkins --namespace jenkins
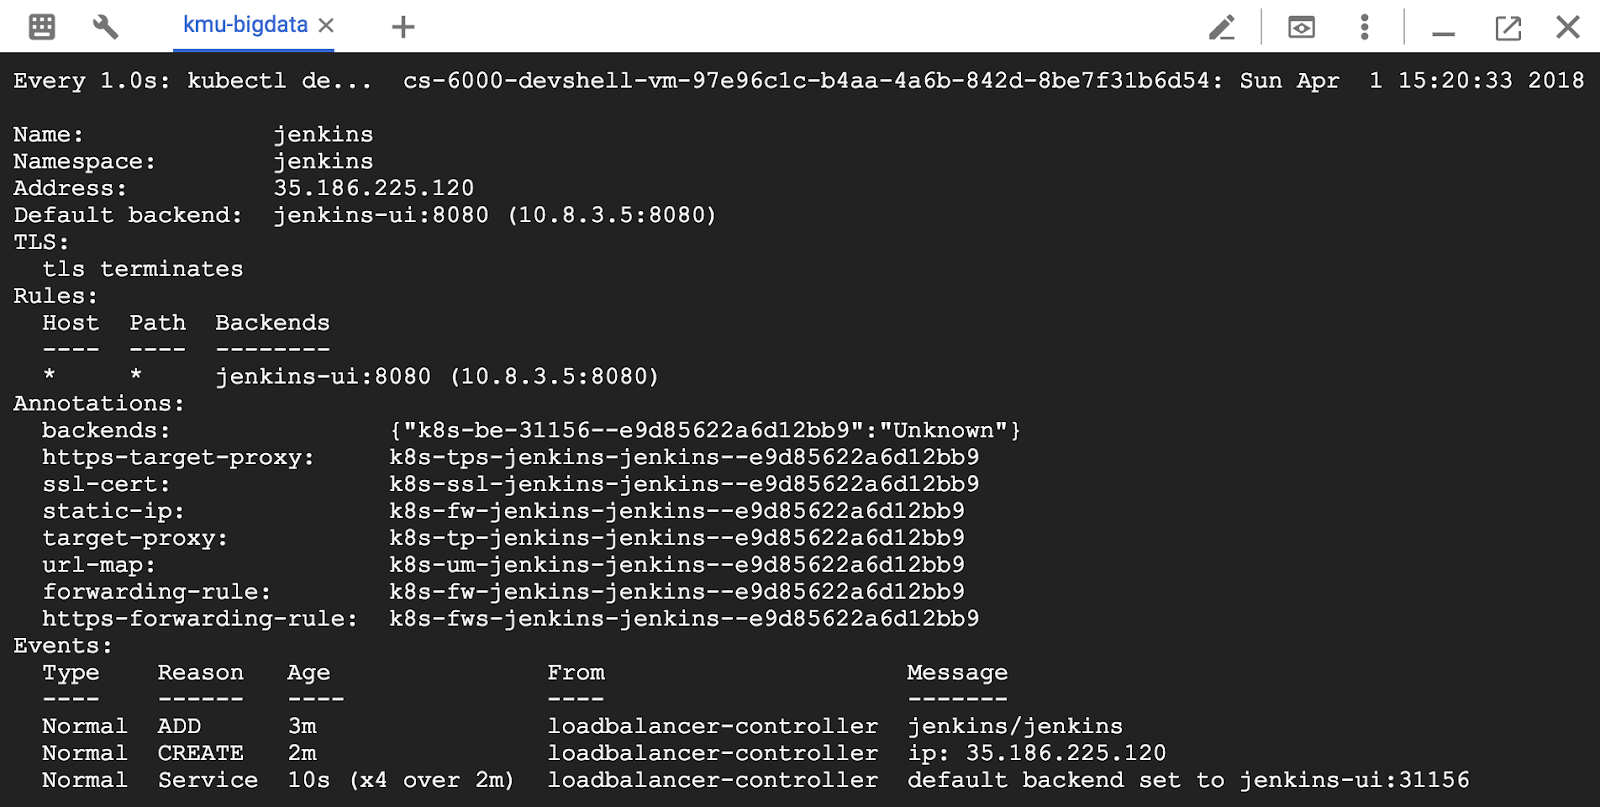
(10~15분 소요) backends 필드가 HEALTHY로 변경됩니다.

출력은 다음과 같습니다.
Name: jenkins
Namespace: jenkins
Address: xxx.xxx.xxx.xxx
Default backend: jenkins-ui:8080 (xxx.xxx.xxx.xxx:8080)
TLS:
tls terminates
Rules:
Host Path Backends
---- ---- --------
Annotations:
https-forwarding-rule: k8s-fws-jenkins-jenkins
https-target-proxy: k8s-tps-jenkins-jenkins
static-ip: k8s-fw-jenkins-jenkins
target-proxy: k8s-tp-jenkins-jenkins
url-map: k8s-um-jenkins-jenkins
backends: {"k8s-be-32371":"HEALTHY"}
백엔드가 정상적이면 다음의 명령을 실행하여 Jenkins의 URL과 암호를 얻습니다.
$ echo "Jenkins URL: https://`kubectl get ingress jenkins -n jenkins -o jsonpath='{.status.loadBalancer.ingress[0].ip}'`";

$ echo "Your username/password: jenkins/$PASSWORD"

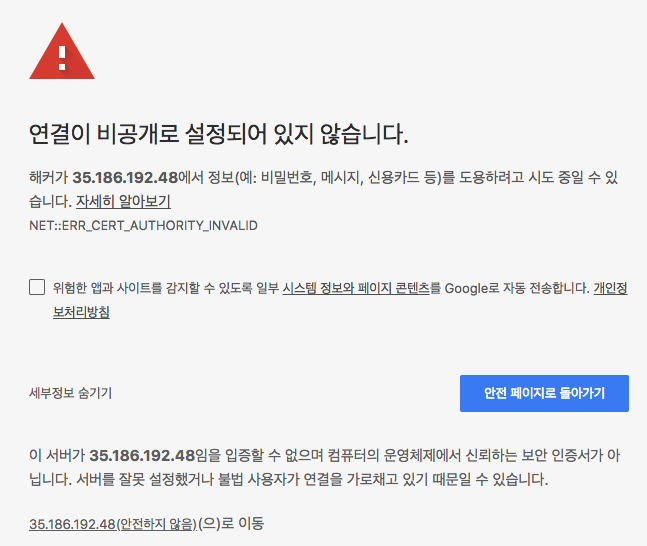
브라우저에서 Jenkins URL을 방문합니다. URL이 안전하지 않으므로 고급을 클릭한 다음 [IP_ADDRESS](안전하지 않음)으로 클릭하여 진행합니다.

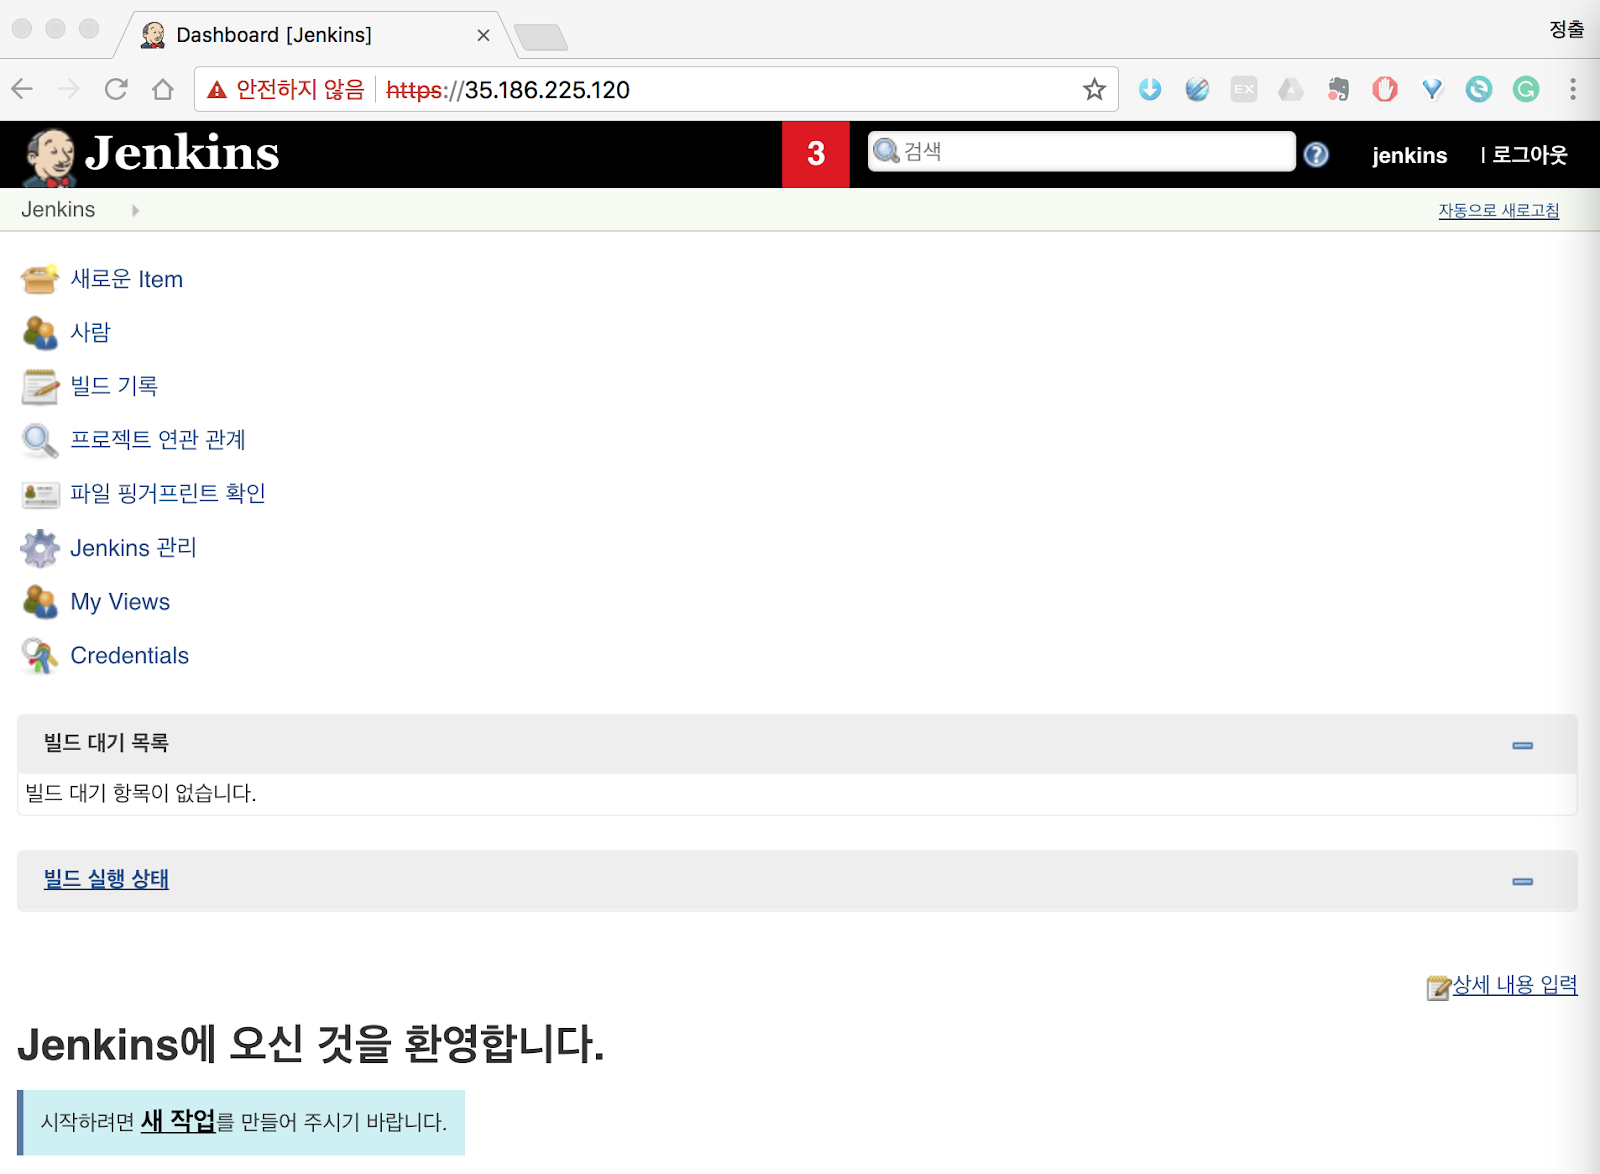
다음의 Jenkins web ui의 화면이 보입니다.

새 작업을 작성한 후 이전 단계에서 표시된 자격증명(credentials)로 로그인하려면 로그인을 누르십시오.
Google Cloud Console에서 확인한 username과 password를 입력합니다.

암호가 틀리다면 다음을 확인하고 패스워드 입력을 해주세요.ㅣ
$ cat jenkins/k8s/options

로그인이 된 화면입니다.
이제 Jenkins를 Kubernetes 클러스터에 설치했습니다. Jenkins는 다음 섹션에서 자동화 된 CI / CD 파이프 라인을 가동 할 것입니다.
Understanding the application
예제 응용프로그램(application)인 gceme를 지속적인 배포(Deployment) 파이프라인에 배포할 것입니다. application은 Go 언어로 작성되었으며, repo의 sample-app 디렉토리에 있습니다. Compute Engine 인스턴스에서 gceme 바이너리(binary)를 실행하면 app이 인스턴스(instance)의 메타데이터(metadata)를 정보 카드에 표시합니다.

application은 두 가지 작동 모드를 지원하며 microservice를 모방합니다.
- 백엔드(backend) 모드 : gceme는 포트 8080을 사용하며, Compute Engine 인스턴스 메타데이터를 JSON 형식으로 반환합니다.
- 프론트엔드(frontend) 모드 : gceme는 백엔드 gceme 서비스를 쿼리(query)하고 결과의 JSON을 사용자 인터페이스에 렌더링합니다.

Deploying the application
응용 프로그램을 두 개의 다른 환경에 배포합니다.
- Production : 사용자가 액세스하는 라이브 사이트입니다.
- Canary : 사용자 트래픽의 일부만 수신하는 소용량 사이트. 이 환경을 사용하여 모든 사용자에게 공개되기 전에 실시간 트래픽으로 소프트웨어의 유효성을 검사할수 있습니다.
Google Cloud Shell에서 sample-app 디렉토리로 이동합니다.
논리적으로 deployment를 격리하려면 Kubernetes namespace를 생성합니다.
$ cd sample-app
$ kubectl create ns production

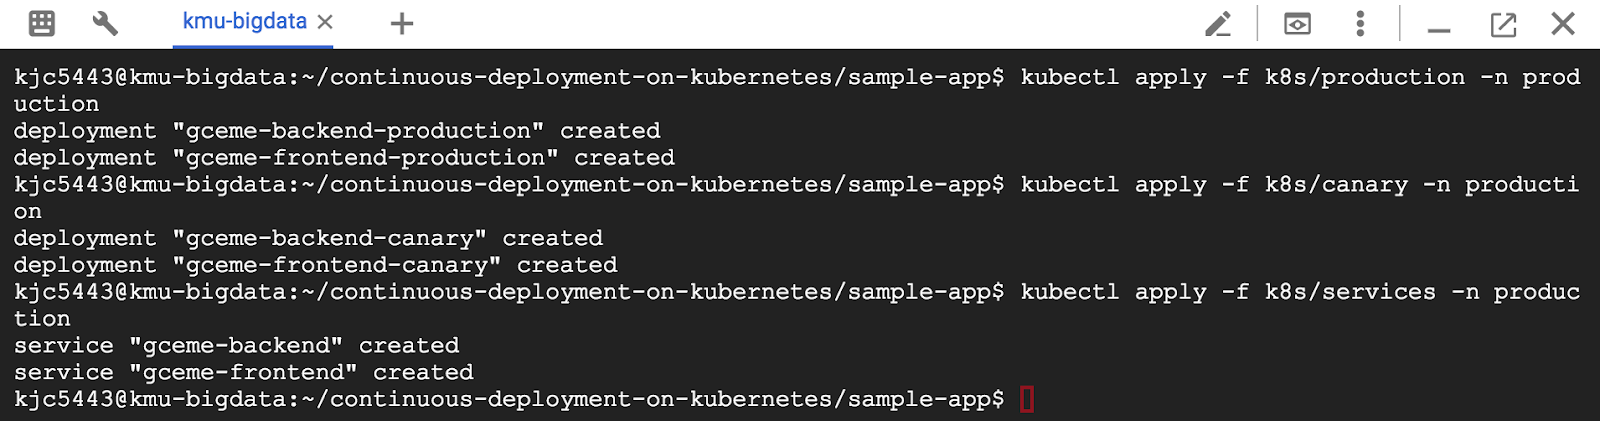
production과 canary의 Deployment를 생성하고, kubectl apply 명령을 사용해 서비스를 생성합니다.
$ kubectl apply -f k8s/production -n production
$ kubectl apply -f k8s/canary -n production
$ kubectl apply -f k8s/services -n production
기본적으로 프런트 엔드의 복제본은 하나만 배포됩니다. kubectl scale 명령을 사용하여 적어도 4 개의 복제본이 항상 실행되고 있는지 확인합니다.
production의 프론트 엔드(front-end) 확장(scale up) :
$ kubectl scale deployment gceme-frontend-production -n production --replicas 4

이제 프론트엔드(frontend)에 5 개의 pd가 있고 프로덕션 traffic에 4 개, canary 릴리즈(releases)에 1 개가 있음을 확인하십시오 (canary release 변경은 사용자 중 20 %만이 영향을 미칩니다).
$ kubectl get pods -n production -l app=gceme -l role=frontend

또한 백엔드용(backend) 2개의 pod(production 1 pod, canary 1 pod)가 있는지 확인하십시오.
$ kubectl get pods -n production -l app=gceme -l role=backend

production 서비스에 대해 외부 IP를 검색해봅시다.
$ kubectl get service gceme-frontend -n production

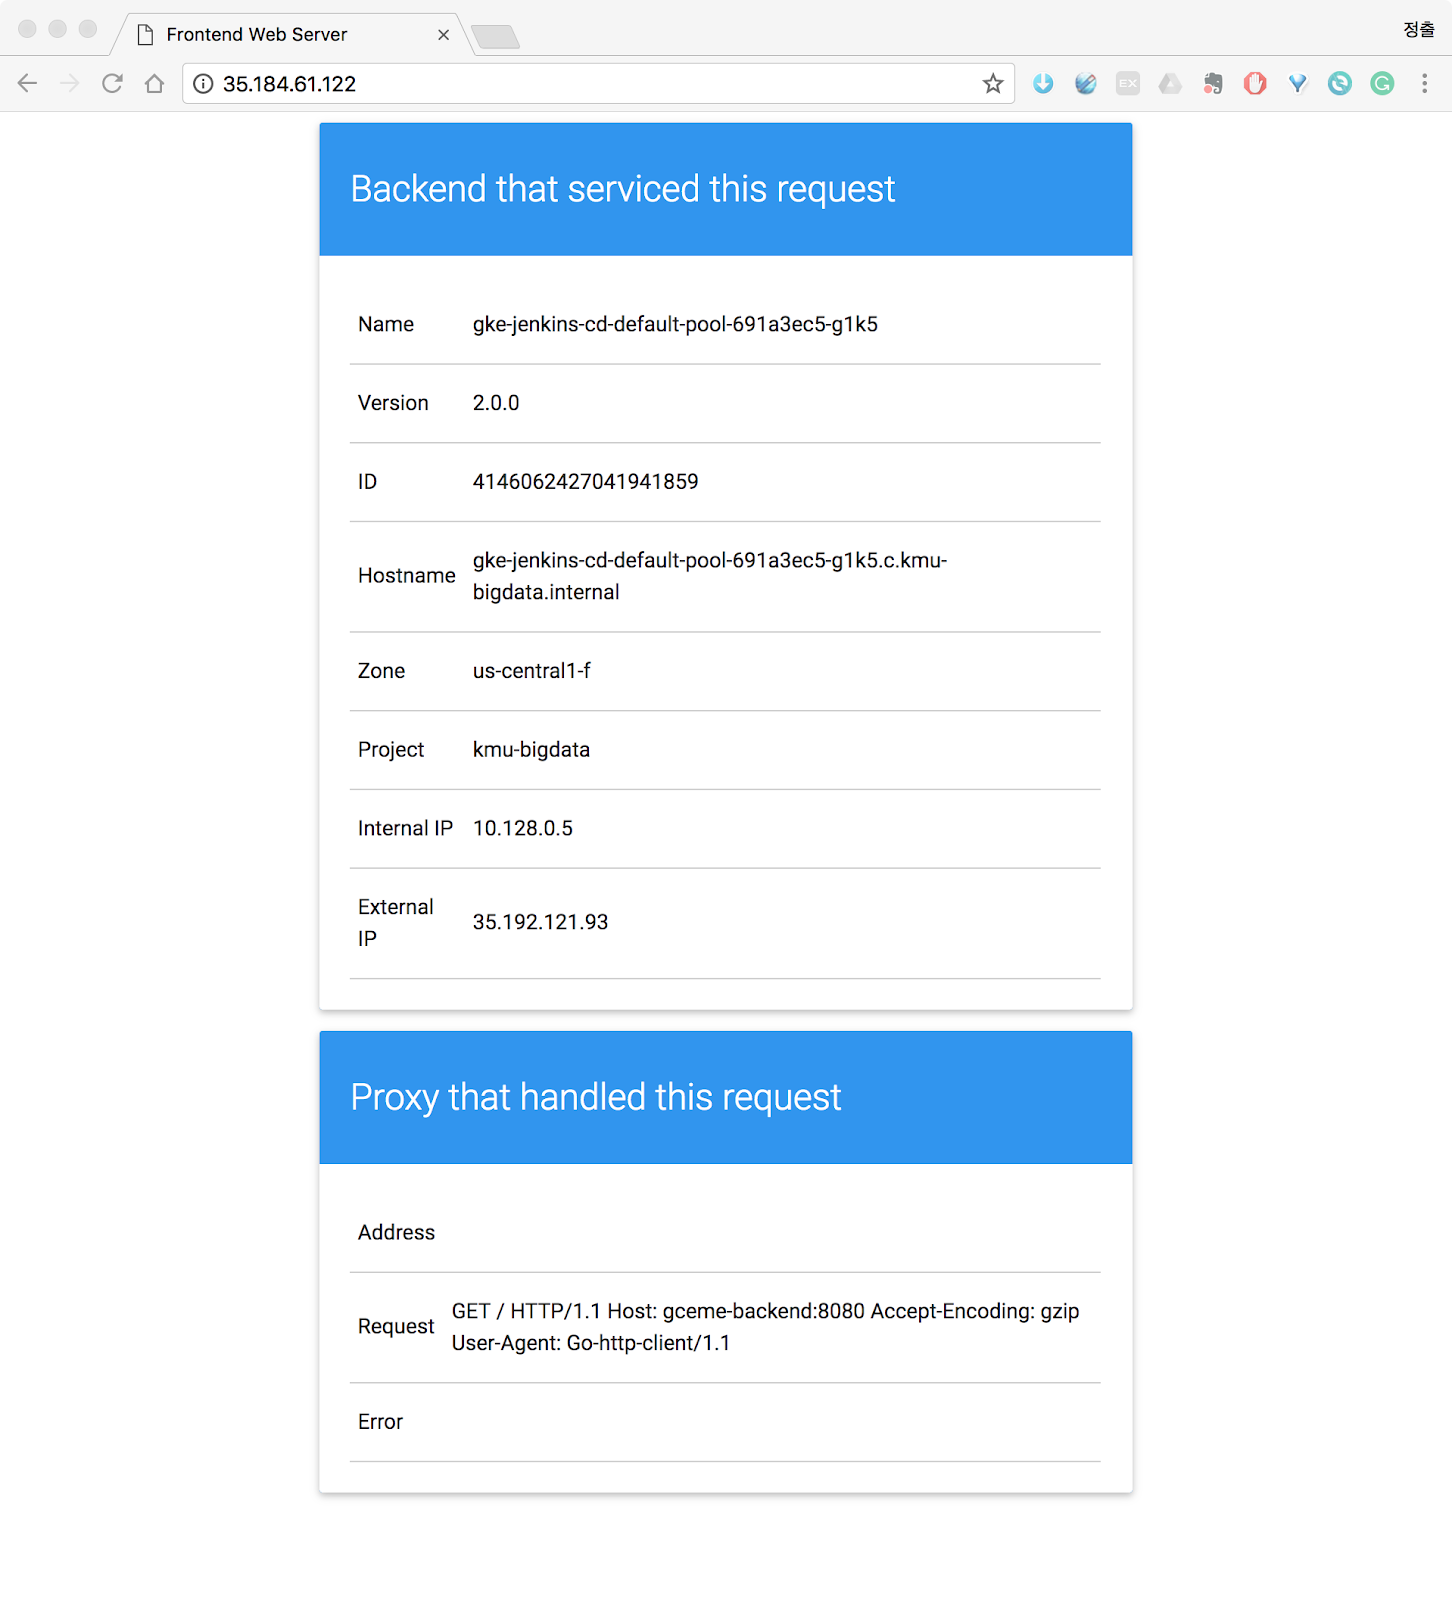
1분 뒤에 EXTERNAL-IP에 고정 IP가 발급됩니다.
고정 IP로 이동하면 다음과 같은 사이트가 나옵니다.
나중에 사용할 수 있도록 프론트 엔드 서비스 로드밸런서(loadbalancer) IP를 환경 변수에 저장하십시오.
$ export FRONTEND_SERVICE_IP=$(kubectl get -o jsonpath="{.status.loadBalancer.ingress[0].ip}" --namespace=production services gceme-frontend)

브라우저에서 프론트엔드(frontend) 외부 IP 주소를 열어 두 서비스가 모두 작동하는지 확인하십시오. /version 경로를 사용하여 서비스의 버전(version) 출력을 확인하십시오. 1.0.0이 출력됩니다.
$ curl http://$FRONTEND_SERVICE_IP/version

sample-app 프로그램을 성공적으로 배포했습니다! 다음은 변경 사항을 지속적으로 안정적으로 배포하기위한 파이프 라인을 설정합니다.
Creating the Jenkins pipeline
sample app 소스 코드를 호스팅하는 저장소(repository) 만들기
gceme 샘플 앱의 복사본을 만들어 클라우드 소스 저장소(Cloud Source Repositories)로 푸시 합니다.
$ gcloud alpha source repos create default

Cloud Source Repositories API 승인

다시 실행해봅시다.

sample-app 디렉토리를 Git 저장소(repository)으로 초기화합니다.
$ git init

$ git config credential.helper gcloud.sh

git config를 통해 username과 email-address를 설정합니다.
$ git config --global user.email "[EMAIL_ADDRESS]"
$ git config --global user.name "[USERNAME]"

[PROJECT_ID]를 본인의 프로젝트 ID로 변경해주세요.
$ git remote add origin https://source.developers.google.com/p/[PROJECT_ID]/r/default

현재 sample-app에 있는 파일과 디렉토리를 전부 add하고, 변경 기록을 커밋하여 push 합니다.
$ git add .
$ git commit -m "Initial commit"
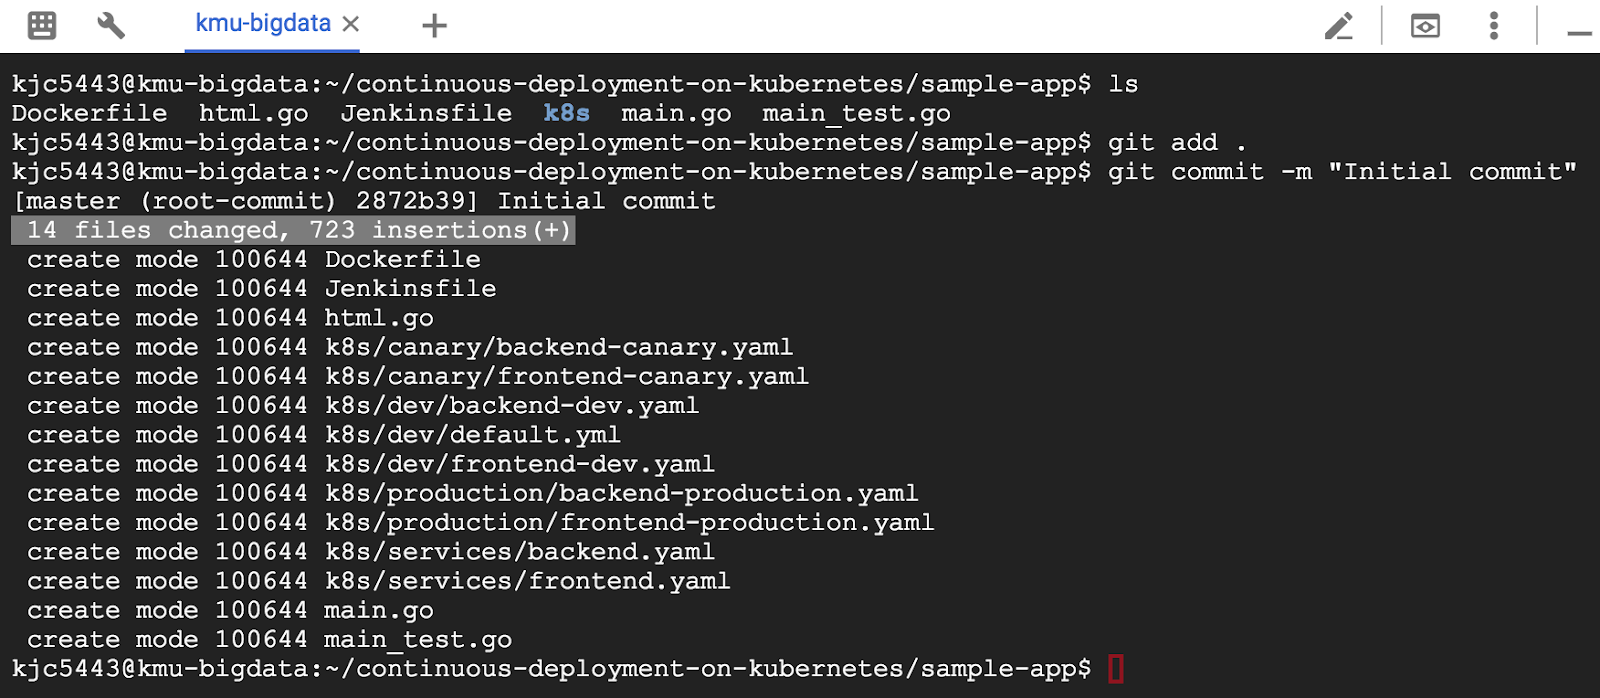
$ git push origin master

service account 자격증명(credentials) 추가하기
Jenkins가 코드 저장소에 액세스 할 수 있도록 자격 증명(credentials)을 구성하십시오. Jenkins는 클라우드 소스 저장소에서 코드를 다운로드하기 위해 클러스터의 서비스 계정 자격 증명을 사용합니다.
[step 1] Jenkins UI에서 왼쪽 네비게이션 메뉴에서 Credentials 을 클릭합니다.

[step 2] Jenkins의 top group을 클릭합니다.
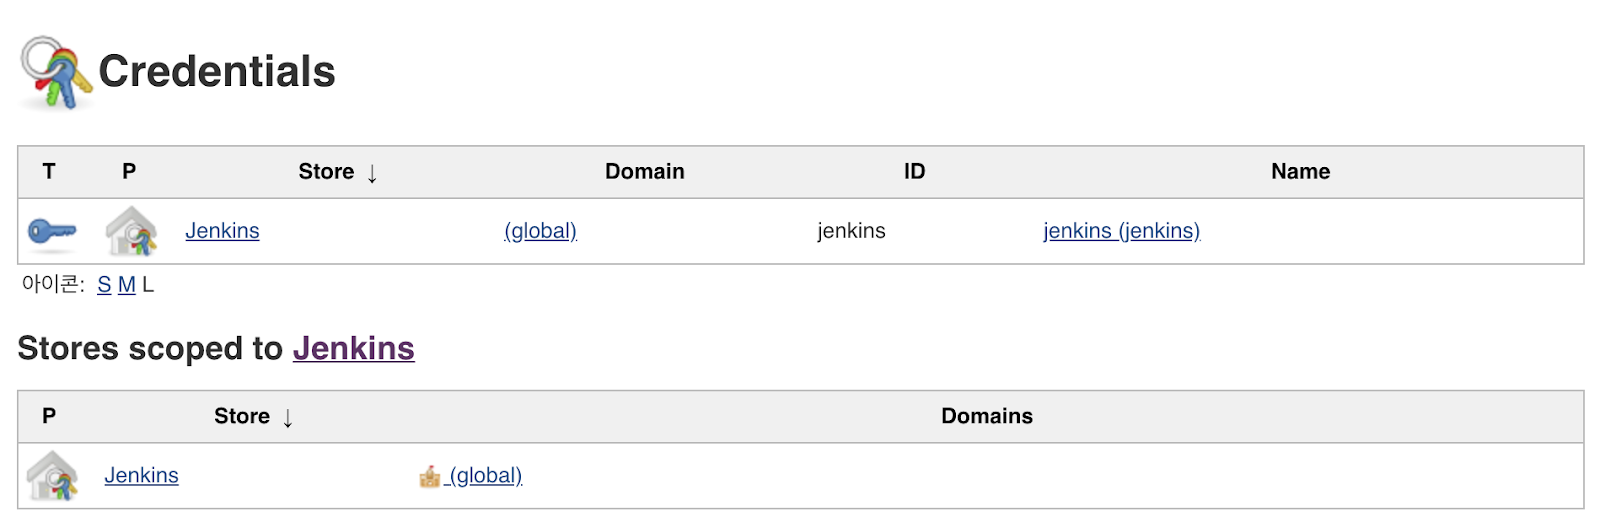
[step 3] Global credentials(unrestricted) 클릭합니다.

[step 4] 왼쪽 네비게이션 메뉴에서 Add Credentials 버튼을 클릭합니다.

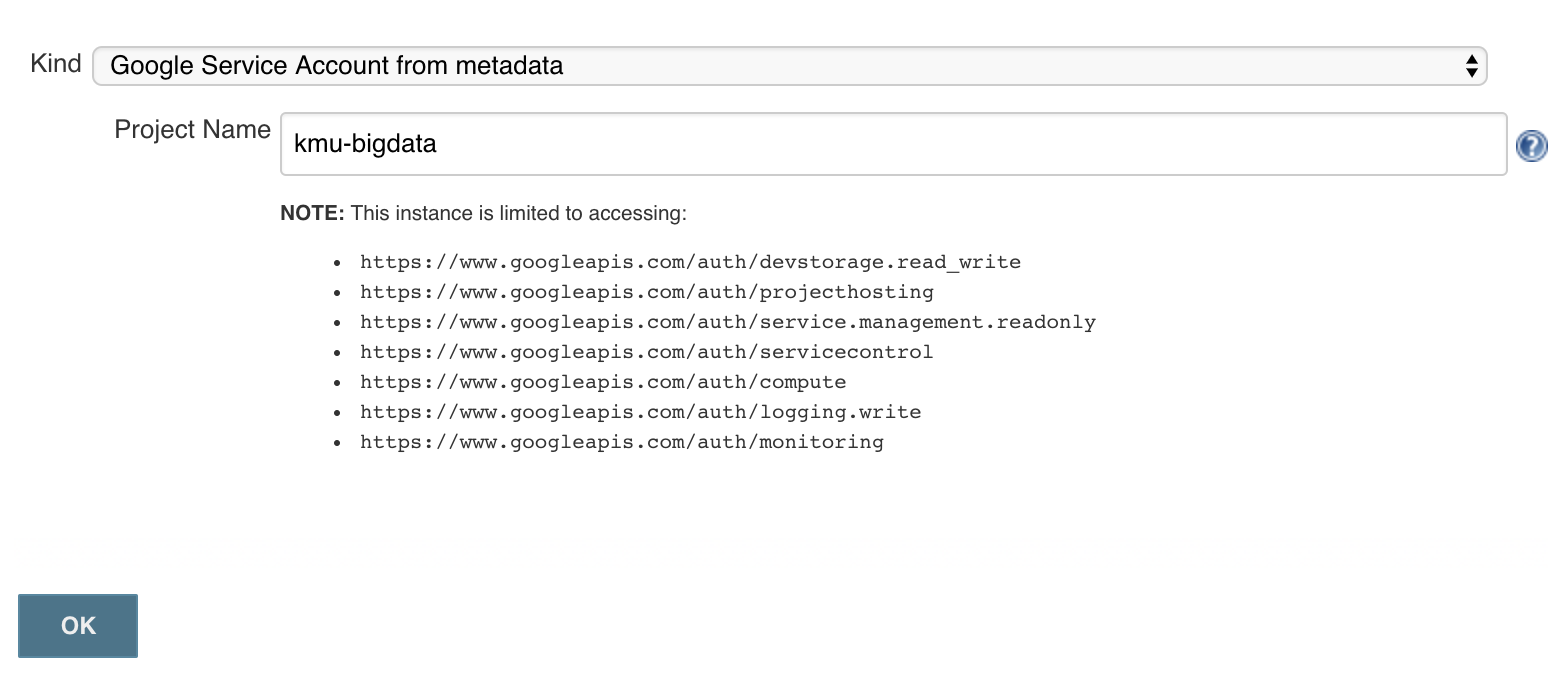
[step 5] 드롭다운 메뉴에서 Google Service Account from metadata를 선택하고 OK 버튼을 클릭합니다.
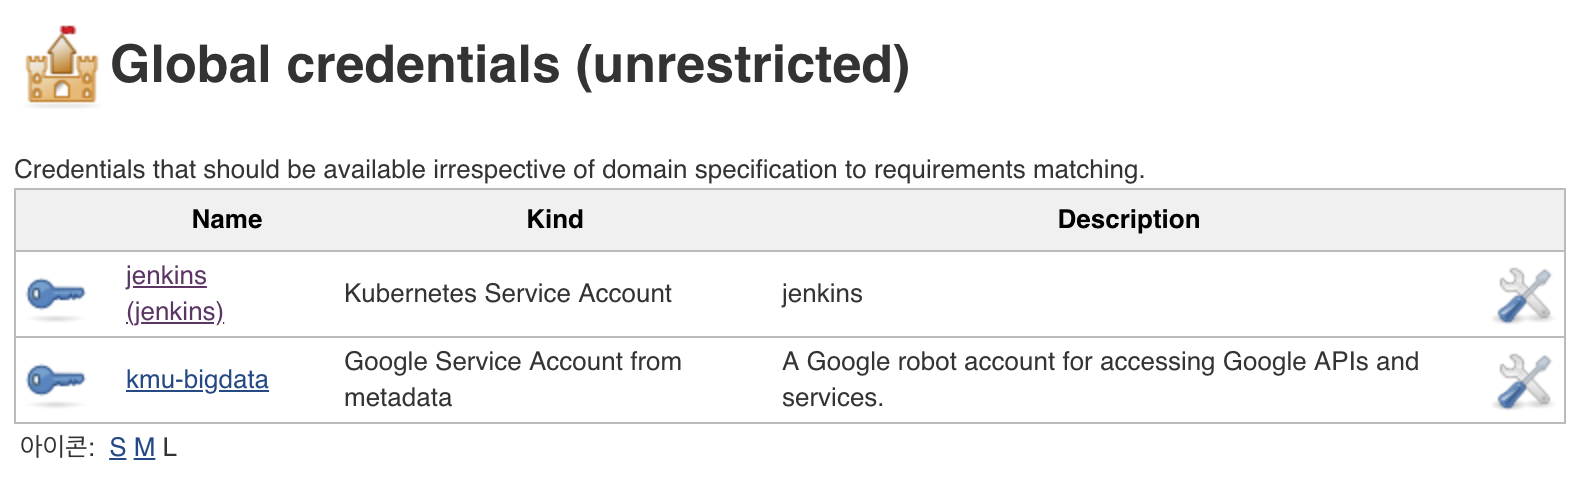
이제 2 가지의 글로벌 자격 증명(credentials)이 있습니다. 하나는 GCP 프로젝트 ID 이름을 가지고 있습니다.
새로운 Job 생성하기
Jenkins UI로 이동하여 다음 단계에 따라 pipeline 작업을 설정해봅시다.
[step 1] 왼쪽 네비게이션에서 Jenkins > New Item을 클릭합니다.

[step 2] 프로젝트 이름을 sample-app으로 지정한다음 Multibranch Pipeline 옵션을 선택하고 OK 버튼을 클릭합니다.

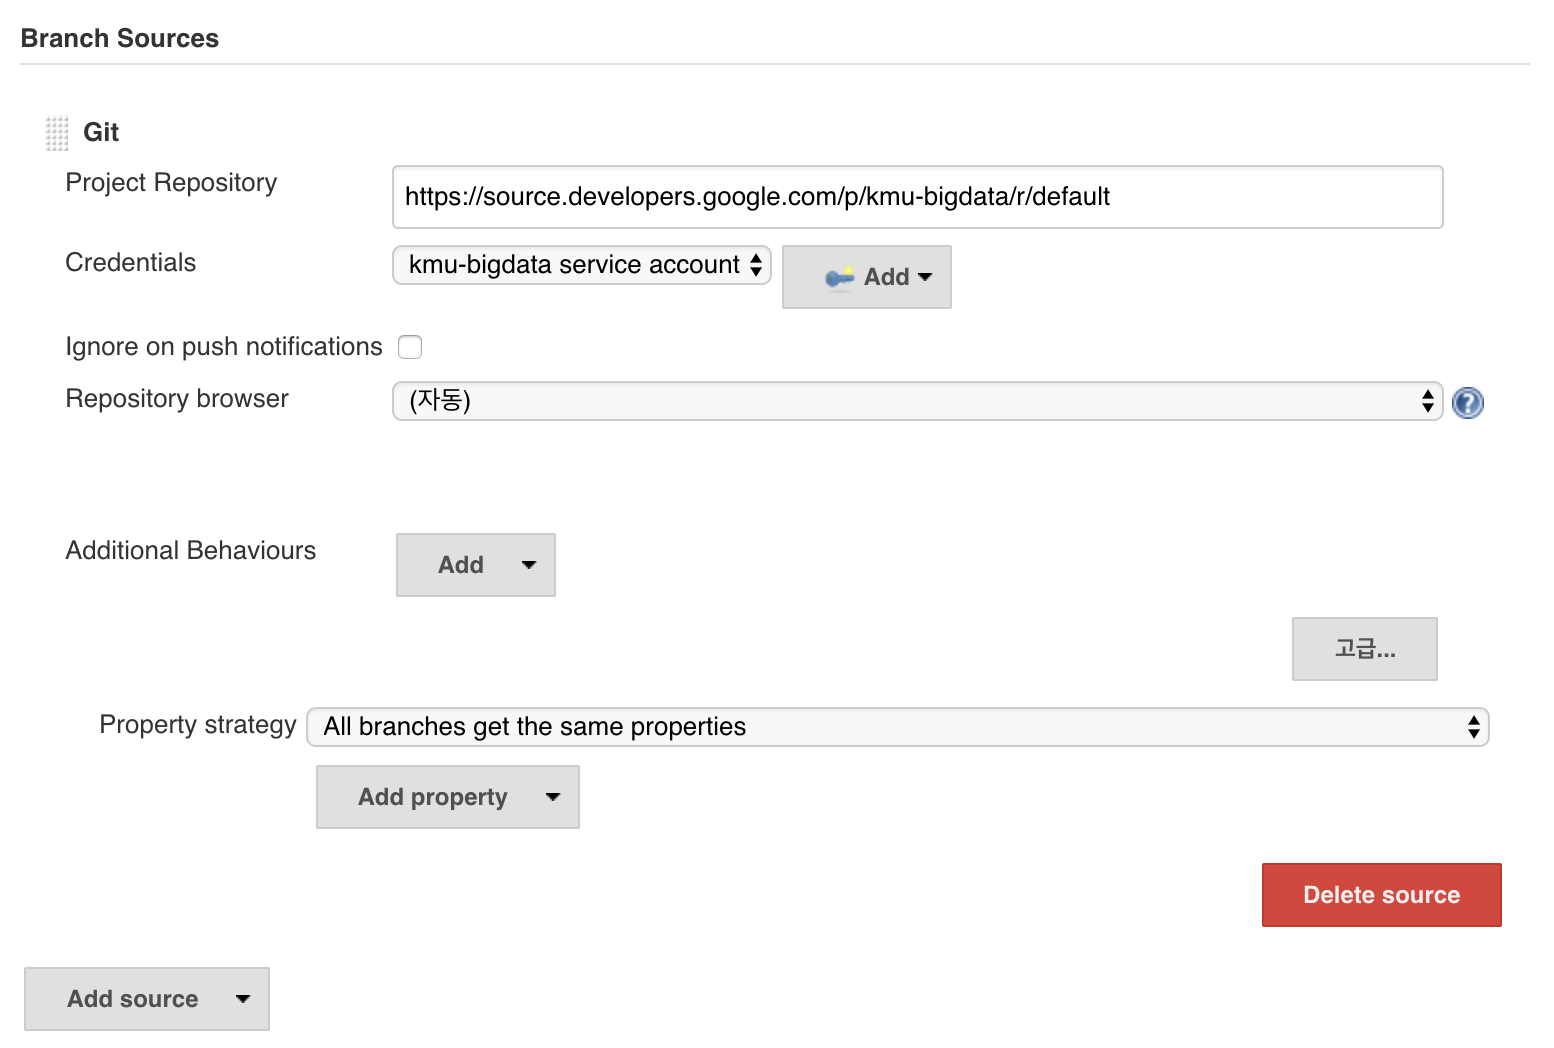
[step 3] 다음의 페이지에서 Branch Sources에서 Add Source를 선택하고 git을 선택합니다.
[step 4] Project Repository 필드에서 Cloud Source Repository에 있는 sample-app의 주소를 붙여넣기 합니다.
https://source.developers.google.com/p/[PROJECT_ID]/r/default
[step 5] Credentials에서는 드롭다운 메뉴에서 우리가 이전에 생성한 프로젝트 ID의 credentials를 선택합니다.
[step 6] Build Triggers에서는 Build Periodically 박스를 선택하고 안에 내용에 * * * * *(공백으로 구분된 별 다섯개)를 입력합니다. Jenkins는 code repository를 매 분마다 확인을 할 것입니다. 이 스케줄(schedule)은 CRON 명령어를 통해 사용됩니다.

[step 7] 마지막으로 우리가 설정해야 될 화면은 다음과 같습니다. Save 버튼을 클릭하여 저장합니다.
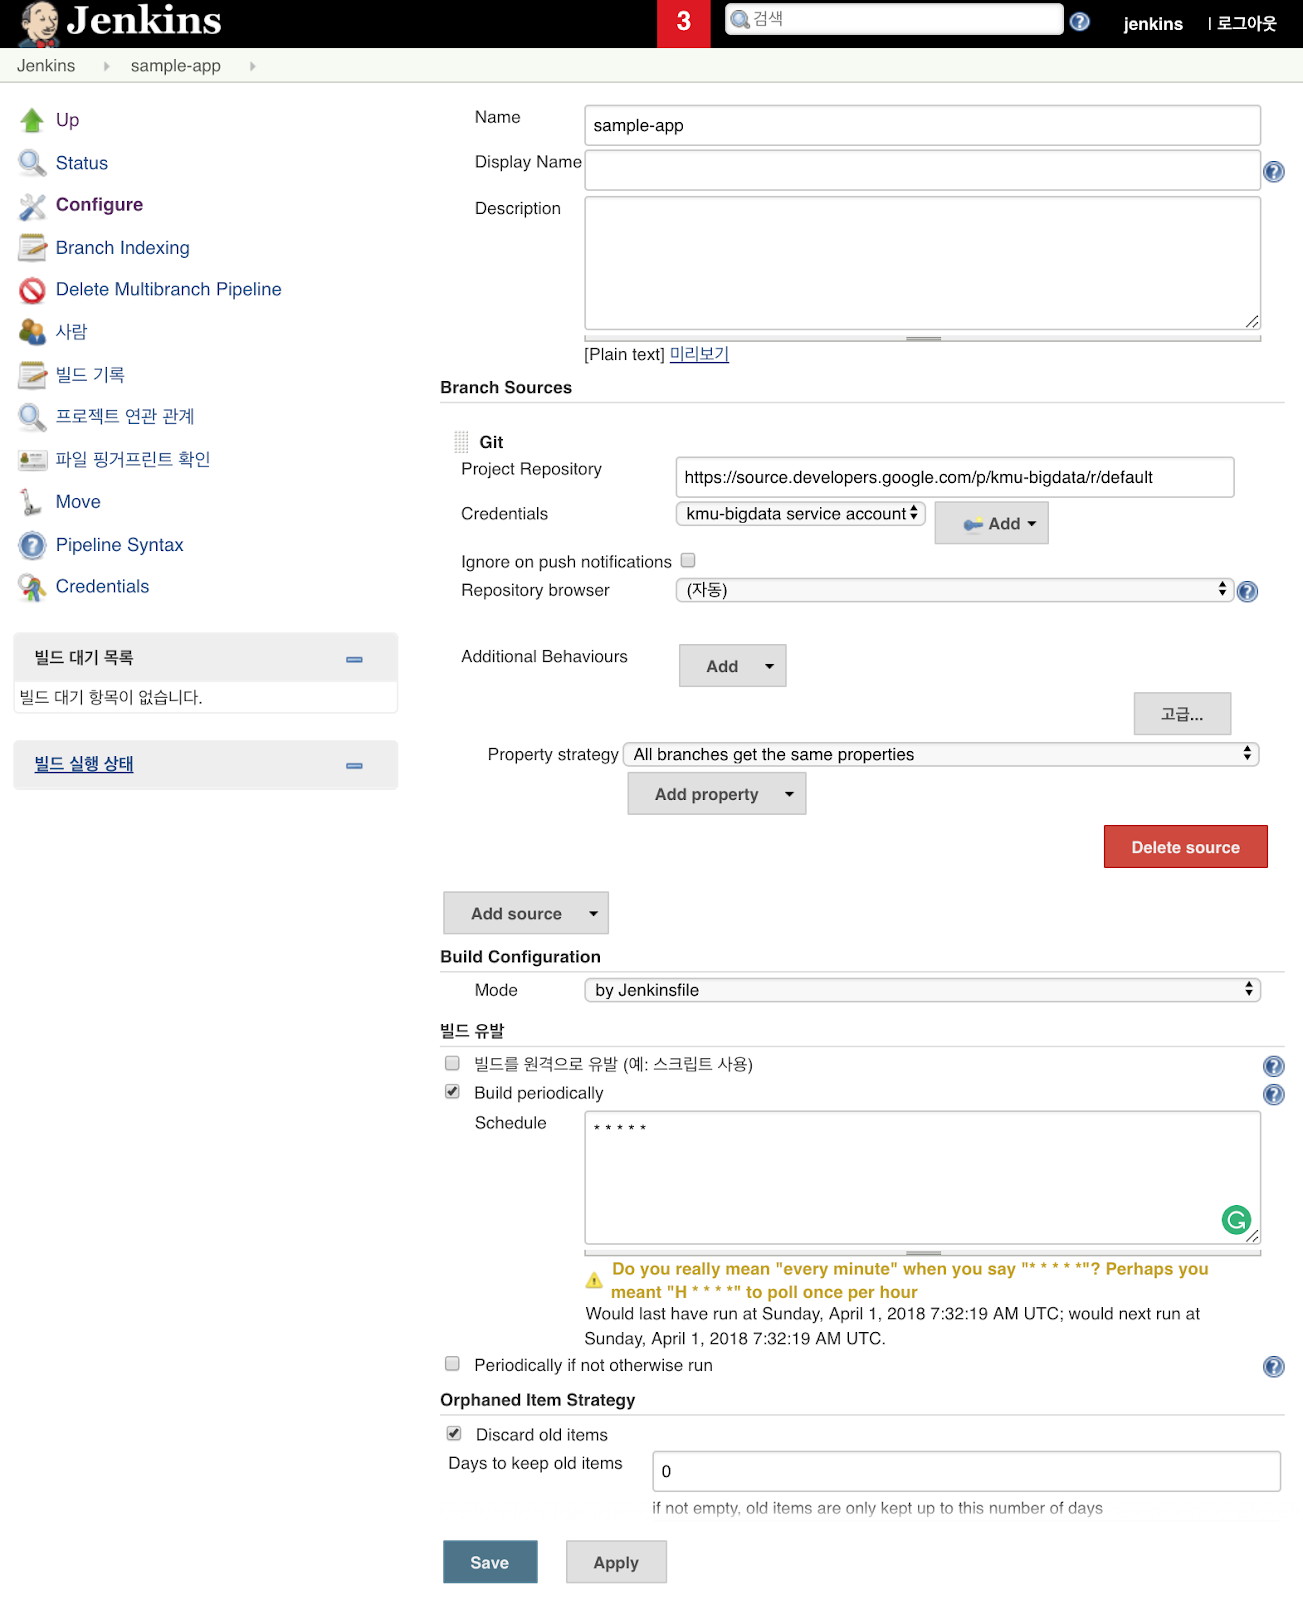
이 단계를 완료하면 "Branch indexing"이라는 작업이 실행됩니다. 이 메타 작업(meta-job)은 저장소(repository)의 branch를 식별하고 변경 사항이 기존 branch에서 발생하지 않았는지 확인합니다. 왼쪽 상단에서 sample-app을 클릭하면 마스터 작업이 표시됩니다.
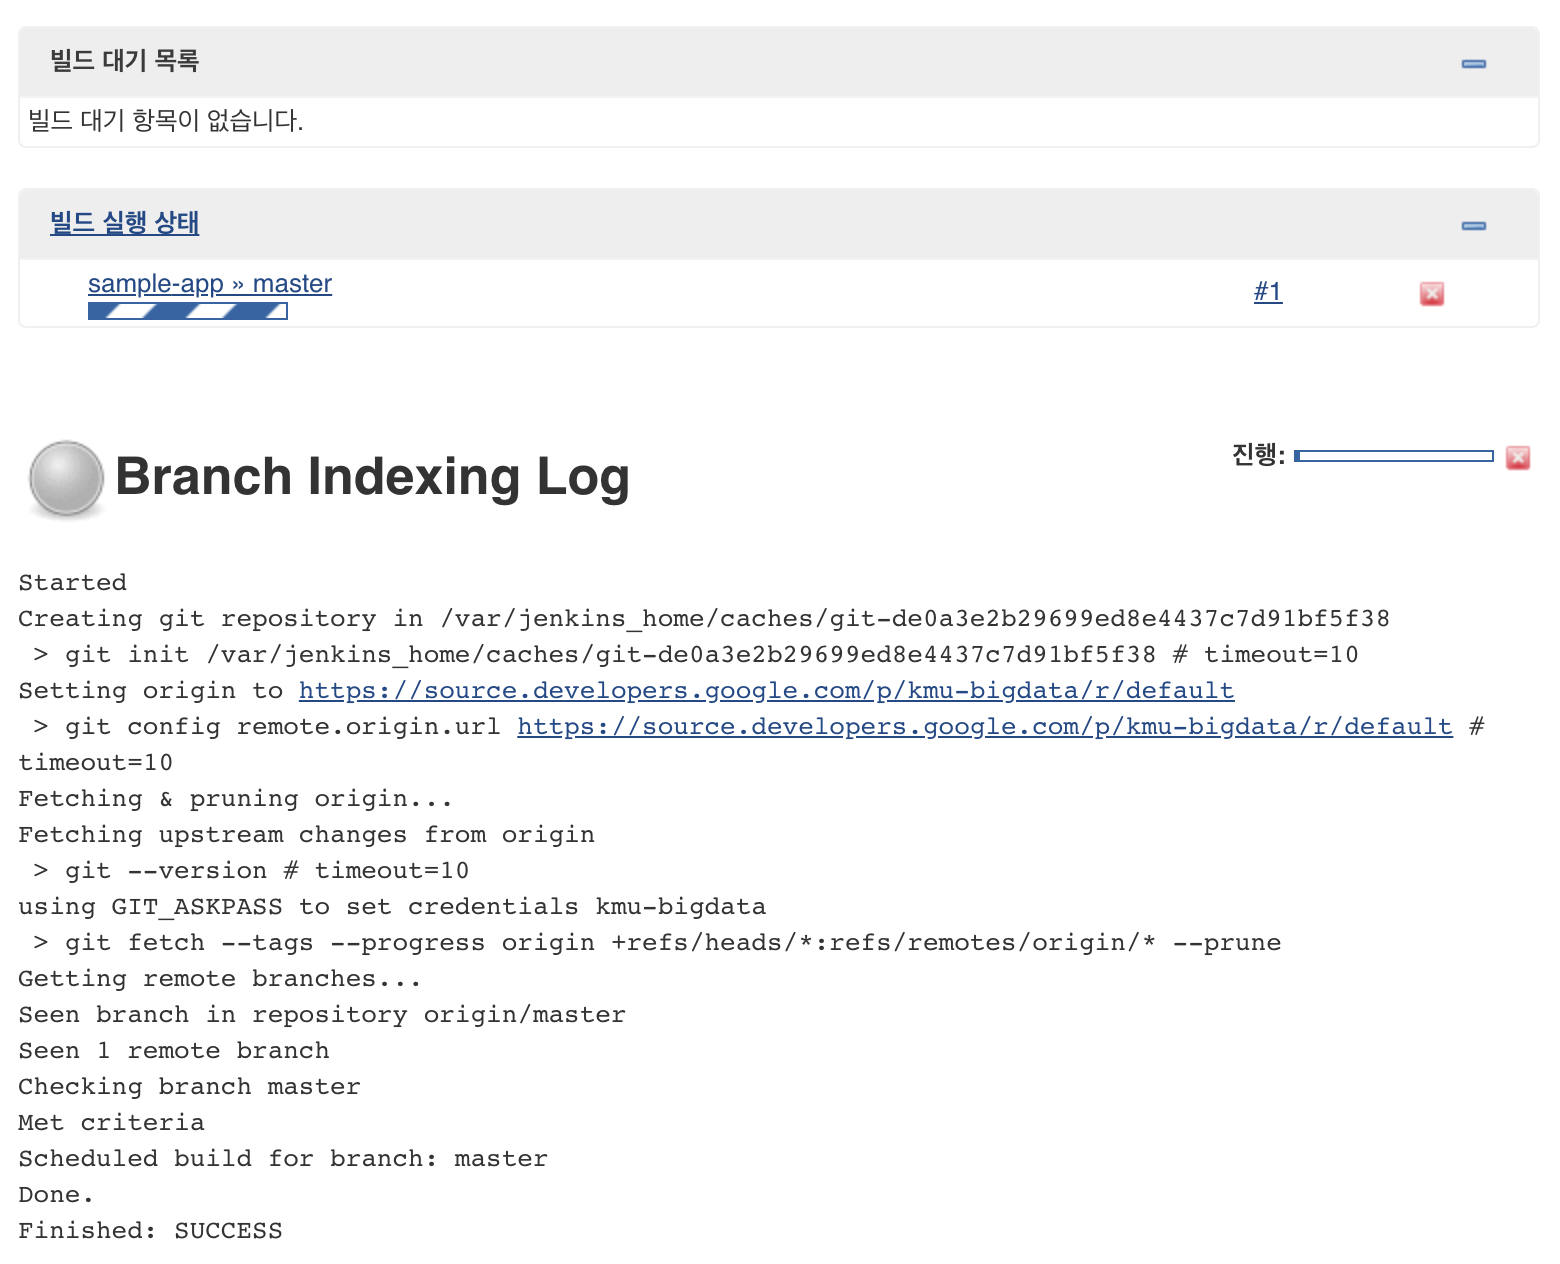
자 이제 우리는 Jenkins의 Pipeline을 생성하였습니다.
Creating the development environment
개발 branche는 개발자가 실제 사이트에 통합하기 위해 제출하기 전에 코드 변경 사항을 테스트하는 데 사용하는 환경 집합입니다. 이러한 환경은 응용 프로그램의 축소 버전이지만 실제 환경과 동일한 메커니즘을 사용하여 배포(deploy)해야 합니다.
deployment branch 생성
feature branch에서 개발 환경을 생성하려면 Git 서버로 branch를 푸시(push)하고 Jenkins가 사용자 환경을 배포(deploy)할 수 있습니다.
deployment branch를 생성하고 Git server로 푸시합시다.
$ git checkout -b new-feature

Pipeline 정의(definition) 수정하기
파이프 라인을 정의하는 Jenkinsfile은 Jenkins Pipeline Groovy syntax 구문을 사용하여 작성됩니다. Jenkinsfile을 사용하면 전체 빌드 파이프 라인을 소스 코드와 함께 존재하는 단일 파일로 표현할 수 있습니다. 파이프 라인은 병렬화 및 수동 사용자 승인이 필요한 강력한 기능을 지원합니다.
파이프 라인이 예상대로 작동하려면 Jenkinsfile을 수정하여 프로젝트 ID를 설정해야합니다.
$ vi Jenkinsfile
Jenkinsfile 내용에서 project에 본인의 Project_ID로 수정합니다.
def project = 'REPLACE_WITH_YOUR_PROJECT_ID'
def appName = 'gceme'
def feSvcName = "${appName}-frontend"
def imageTag = "gcr.io/${project}/${appName}:${env.BRANCH_NAME}.${env.BUILD_NUMBER}"

저장합니다.
site 수정하기
application을 변경하는 방법을 보기 위해 gceme 카드를 파란색에서 주황색으로 변경합니다.
html.go 파일을 먼저 수정합시다.
$ ~/continuous-deployment-on-kubernetes/sample-app
$ vi html.go
<div class=”card blue”> 2개에서 card orange로 수정합시다.
<div class="card orange">

저장하고 다음은 main.go 파일을 수정합시다.
$ vi main.go

version을 1.0.0에서 2.0.0 으로 수정해봅시다.
const version string = "1.0.0"
const version string = "2.0.0"
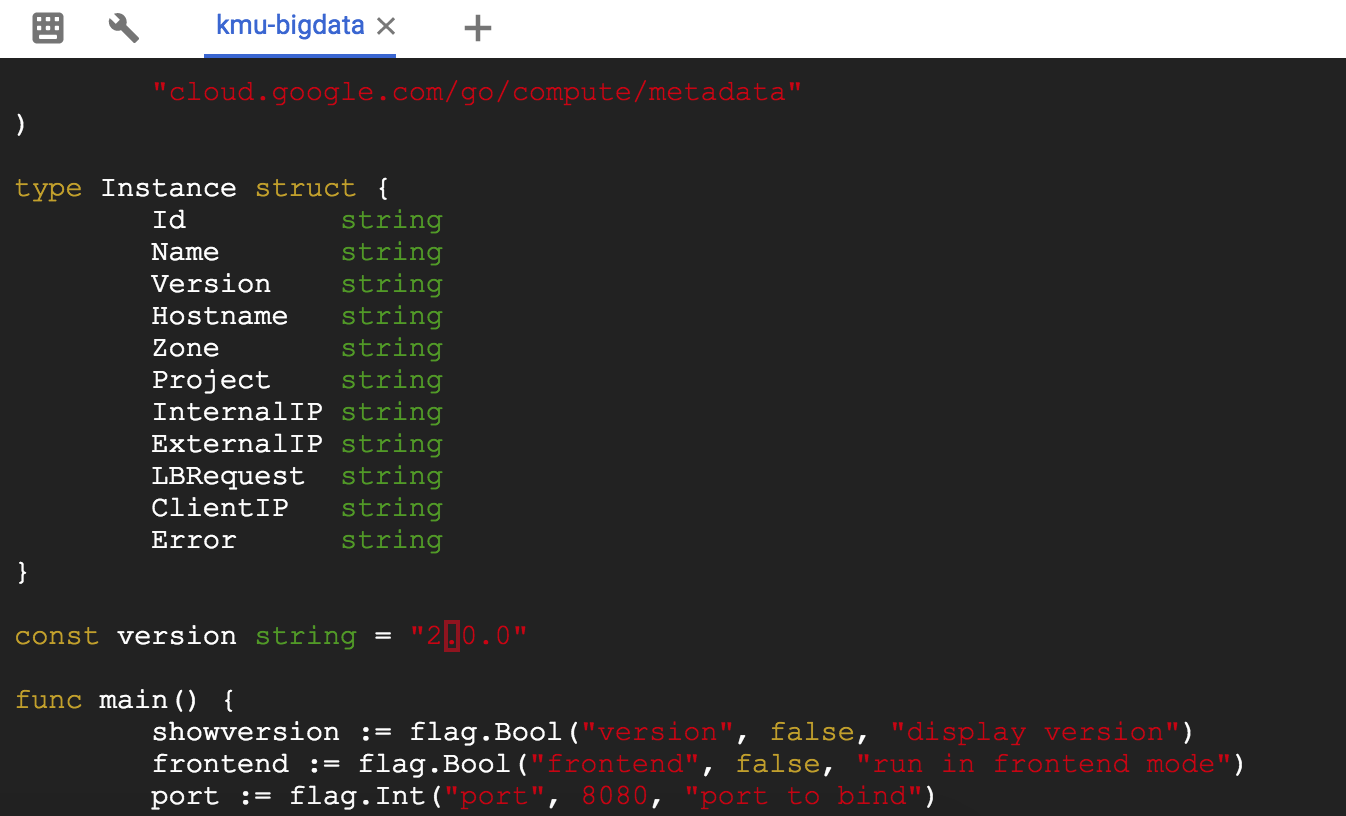
저장합니다.
deployment 시작
변경 기록을 commit하고 push합니다.
$ git add Jenkinsfile html.go main.go
$ git commit -m "Version 2.0.0"
$ git push origin new-feature
개발 환경 빌드가 시작됩니다.
변경 사항이 Git 저장소(repository)로 push 된 후 Jenkins UI로 이동하여 new-feature branch에 대한 build가 시작되었음을 알 수 있습니다. 최대 1분 이상이 걸립니다.
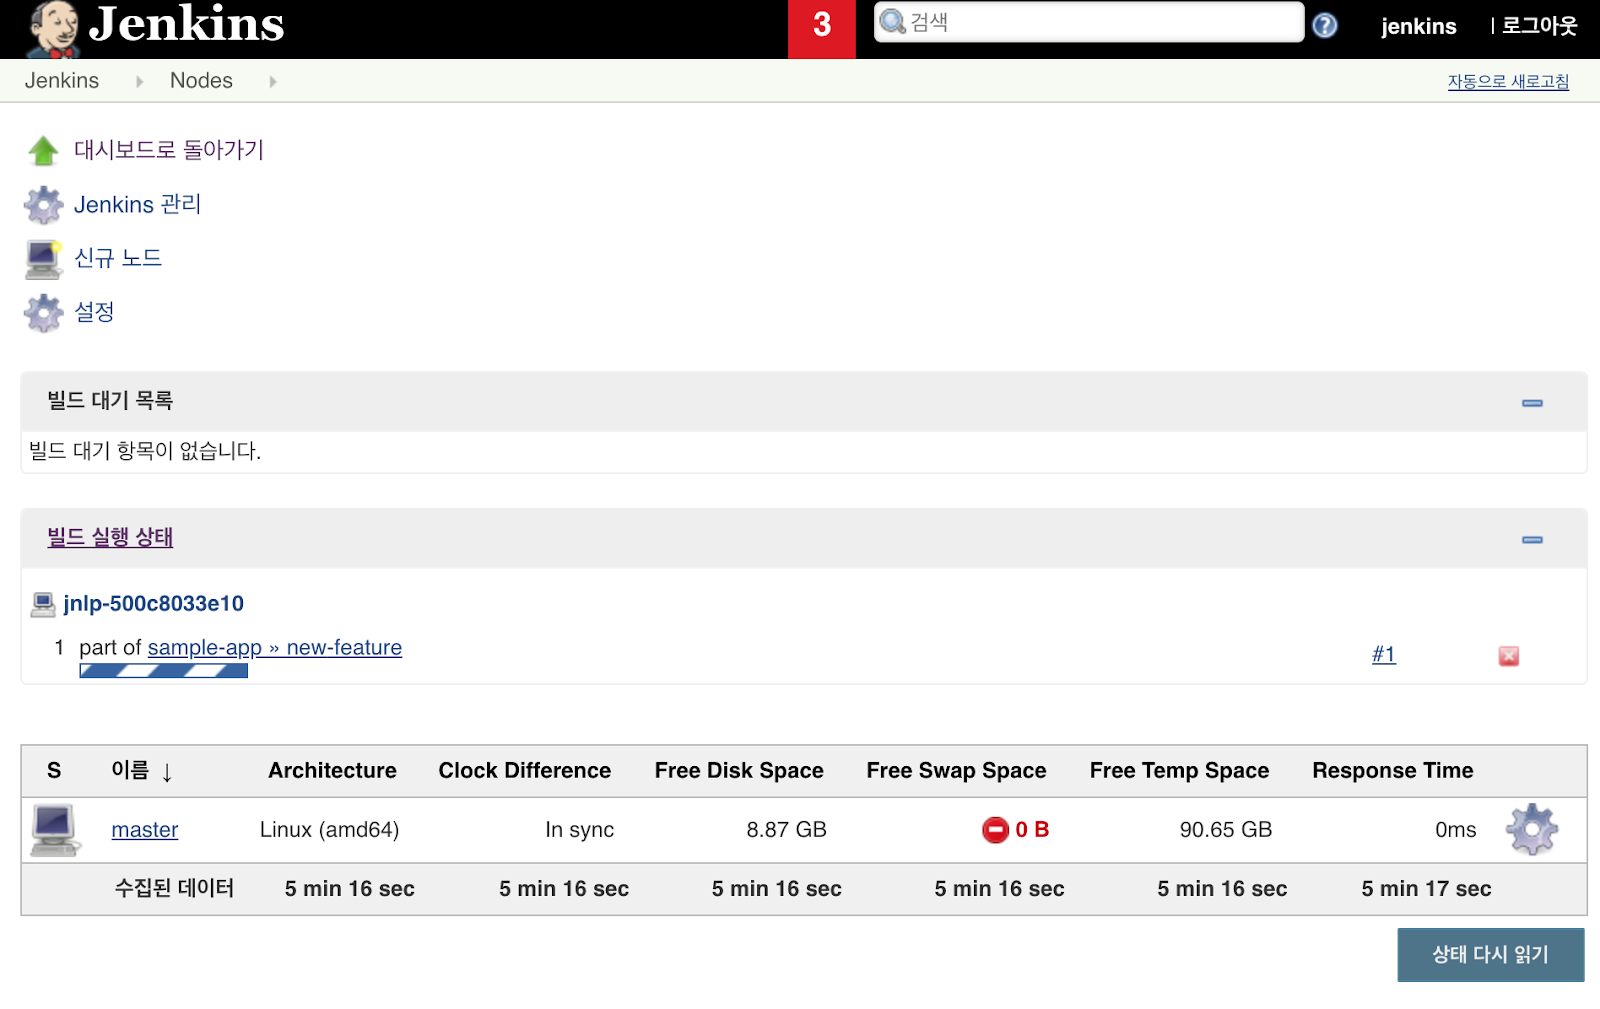
빌드가 실행 된 후 Console output 버튼을 클릭해봅시다.
몇 분 동안 빌드의 출력을 추적하고, kubectl --namespace = new-feature apply … 메시지가 시작되는 지 관찰해봅시다. 이제 new-feature branch가 클러스터에 배포(deploy)됩니다.
개발 시나리오에서는 공용 로드밸런서를 사용하지 않습니다.애플리케션 보안을 위해 kubectl proxy 를 사용할 수 있습니다.
프록시(proxy)는 Kubernetes API를 사용하여 자신을 인증하고 서비스를 인터넷에 노출시키지 않고 로컬 컴퓨터의 요청을 클러스터의 서비스로 프록시합니다.
background에 proxy를 시작합니다.
$ kubectl proxy &

localhost에 요청을 보내고 kubectl 프록시가 서비스에 서비스를 전달하도록 하여 응용 프로그램에 액세스 할 수 있는지 확인하십시오.
$ curl http://localhost:8001/api/v1/proxy/namespaces/new-feature/services/gceme-frontend:80/version

현재 실행 중인 버전이 2.0.0으로 응답해야 합니다.
개발 환경(deployment environment)를 설정했습니다.
다음은 Kubernetes에 배포를 canary 릴리즈로 배포해봅시다.
Deploying a canary release
앱이 개발 환경에서 최신 코드를 실행하고 있음을 확인하였으므로 해당 코드를 canary 환경에 배포(deploy)합시다.
canary branch를 생성하고 Git 서버로 푸시(push)합시다.
$ git checkout -b canary
$ git push origin canary

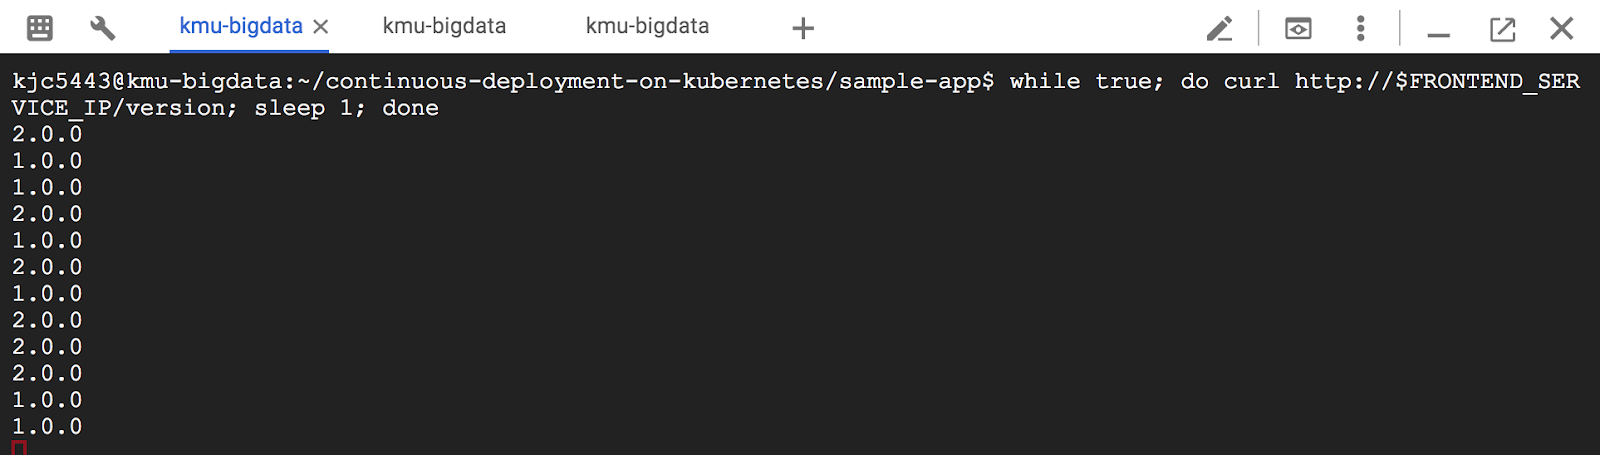
Jenkins에서는 canary 파이프 라인이 시작되었음을 알 수 있습니다. 완료되면 서비스 URL을 확인하여 일부 트래픽이 새 버전에서 제공되고 있는지 확인할 수 있습니다. 버전 2.0.0을 반환하는 약 5 건의 요청 중 하나가 표시되어야합니다.

ort FRONTEND_SERVICE_IP=$(kubectl get -o jsonpath="{.status.loadBalancer.ingress[0].ip}" --namespace=production services gceme-frontend)

$ while true; do curl http://$FRONTEND_SERVICE_IP/version; sleep 1; done
우리는 canary release를 배포했습니다. 이제 production으로 배포해봅시다.
Deploying to production
이제 canary가 출시되었고, 사용자의 불만을 듣지 않아 production에 deploy 합시다.
canary branch를 master branch와 merge하고, Git 서버로 푸시합시다.
$ git checkout master
$ git merge canary
$ git push origin master

Jenkins에서는 Master Pipe line이 시작된 것을 확인할 수 있습니다.
완료되면 서비스 URL을 확인해 모든 트래픽이 새 버전인 2.0.0 으로 제공되는 것을 확인할 수 있습니다.
$ export FRONTEND_SERVICE_IP=$(kubectl get -o jsonpath="{.status.loadBalancer.ingress[0].ip}" --namespace=production services gceme-frontend)
$ while true; do curl http://$FRONTEND_SERVICE_IP/version; sleep 1; done

gceme application의 정보 카드를 표시하는 사이트로 확인하여 변경 사항을 확인해봅시다. 카드 색상이 주황색으로 변경되었습니다.
$ kubectl get service gceme-frontend -n production


'Google Cloud Platform' 카테고리의 다른 글
| Google Cloud ML Vision API를 이용한 이미지 텍스트 추출 그리고 번역을 위한 Translation API와 Natural Language API (1) | 2018.04.10 |
|---|---|
| Deployments 관리 Kubernetes in Google Cloud Platform (0) | 2018.04.08 |
| Docker Hadoop 클러스터 Hive 설치 (0) | 2018.03.28 |
| Orchestrating Google Cloud with Kubernetes (0) | 2018.03.12 |
| Google Cloud with Kubernetes (0) | 2018.03.09 |
Jenkins Kubernetes Google Cloud
Orchestrating Google Cloud with Kubernetes
Overview
이번 실습에서는 Kubernetes Engine에서 실행되는 Jenkins를 사용하여 연속적으로 제공하는 파이프라인(pipeline)을 설정하는 방법을 배웁니다. 자세한 사항은 여기서 Jenkins on Kubernetes Engine 볼 수 있습니다.
What we’ll do
- Jenkins application을 Kubernetes 엔진 클러스터에 제공합니다.
- Jenkins application을 설정하기 위해 설정(configuration) 파일, 자격 증명(credentials), 네임 스페이스(namespace), load balancing을 사용합니다.
- Jenkins application을 연습하고 pipeline을 생성합니다.
Jenkins
Jenkins는 빌드(build), 테스트(test) 및 deployment pipeline을 유연하게 조율할 수 있는(orchestrate) 오픈 소스 자동화(automation) 서버입니다.
Continuous Delivery / Deployment?
Continuous Delivery(CD) 파이프 라인을 설정해야하는 경우, Jenkins를 Kubernetes Engine에 배포하면 표준 VM 기반 Deployment 보다 중요한 이점을 얻을 수 있습니다. 빌드(build) 프로세스에서 컨테이너(container)를 사용하는 경우 하나의 가상 호스트가 여러 운영 체제에 대해 작업을 실행할 수 있습니다. Kubernetes Engine은 임시 build executor를 제공하여 각 build가 이전 build와 동일한 깨끗한 환경에서 실행되도록합니다. build executor 의 일시적인 현상의 일부로 Kubernetes Engine 클러스터는 build가 활발하게 실행될 때만 사용되므로 일괄 처리(batch processing) 작업과 같은 다른 클러스터 작업에 리소스를 사용할 수 있습니다.
build executor가 몇 초안에 시작됩니다. Kubernetes Engine은 Google global 로드밸런서(load balancer)를 활용하여 웹 트래픽(web traffic)을 사용자의 인스턴스(instance)로 라우팅합니다. 로드밸런서는 SSL 종료를 처리하고, Google backbone 네트워크를 통해 사용자에게 가장 가까운 현재 위치에서 가장 빠른 경로 중 하나에서 사용자를 웹 프론트앤드(frontend)로 라우팅하는 글로벌 IP 주소를 제공합니다.
Provisioning Jenkins
Kubernetes 클러스터(cluster) 생성
Kubernetes Engine 클러스터가 연결하여 사용할 수 있도록 Compute Engine 네트워크를 만듭니다.
$ gcloud compute networks create jenkins --subnet-mode auto
Kubernetes cluster Provision:
f1-micro로 에서 작동하면 Resource 할당 오류로 기본 Machine Type으로 진행합니다.
$ gcloud container clusters create jenkins-cd --num-nodes 5 --machine-type --network jenkins --zone us-central1-f --scopes "https://www.googleapis.com/auth/projecthosting,storage-rw"
이 단계를 완료하는 데 몇 분이 소요될 수 있습니다. Jenkins는 추가 범위를 통해 Cloud Source Repositories 및 Google Container Registry에 액세스 할 수 있습니다.
클러스터가 실행 중인지 확인하십시오.
$ gcloud container clusters list
클러스터의 자격증명(credential)을 만들어봅시다.
$ gcloud container clusters get-credentials jenkins-cd --zone us-central1-f
Kubernetes Engine 이 자격증명(credential)을 사용하여 새로 프로비저닝(provisioning)된 클러스터에 접근합니다.
클러스터에 연결할 수 있는지 확인합니다.
$ kubectl cluster-info
Jenkins 홈 볼륨(home volume) 생성
Jenkins가 Kubernetes Engine의 Jenkins에서 설명한 설정(configurations)으로 Jenkins를 미리 준비하기 위해 제공된 tarball에서 Volume 을 생성합니다.
$ gcloud compute images create jenkins-home-image --source-uri https://storage.googleapis.com/solutions-public-assets/jenkins-cd/jenkins-home-v3.tar.gz
$ gcloud compute disks create jenkins-home --image jenkins-home-image --zone us-central1-f
Kubernetes Engine은 이 volume을 Jenkins pod에 마운트(mount)합니다. 이 단계는 완료하는데 5-10분이 소요됩니다.
Github Clone Repository
Zone을 설정한 다음 Github에 있는 저장소(Repository)를 Cloud Shell에서 복사(clone)합니다. Jenkins를 배포하는 데 사용할 Kubernetes manifests가 포함되어 있습니다. manifests와 설정은 Kubernetes Engine용 Jenkins 설정(configuring)에서 설명합니다.
$ gcloud config set compute/zone us-central1-f
$ git clone https://github.com/GoogleCloudPlatform/continuous-deployment-on-kubernetes.git
$ cd continuous-deployment-on-kubernetes
Jenkins 자격증명(Credentials) 설정
다음 명령을 실행하여 랜덤 암호를 생성하고, options 파일을 업데이트합니다.
$ export PASSWORD=`openssl rand -base64 15`; echo "Your password is $PASSWORD"; sed -i.bak s#CHANGE_ME#$PASSWORD# jenkins/k8s/options
$ cat jenkins/k8s/options
다음 출력은 [PASSWORD_STRING]에 암호가 들어 있음을 표시합니다.
비밀번호는 [PASSWORD_STRING]입니다.
Jenkins를 위한 Kubernetes namespace를 생성합니다.
$ kubectl create ns jenkins
Namespace를 사용하면 리소스(Resource)에 고유한 이름을 지정하지 않고도 여러 환경에서 동일한 자원(resource) manifests를 사용할 수 있습니다.
Kubernetes secret를 생성합니다.
$ kubectl create secret generic jenkins --from-file=jenkins/k8s/options --namespace=jenkins
Kubernetes는 이 객체를 사용하여 Jenkins가 부팅할 때 Jenkins에 기본 사용자 이름과 암호를 제공합니다.
Deploy Jenkins
이 섹션에서는 샘플 코드의 jenkins/k8s 폴더에 정의된 Kubernetes 자원(resource)를 기반으로 Jenkins Deployment 및 Service를 생성합니다.
kubectl apply : Jenkins를 실행하기 위한 컨테이너(container)와 Jenkins 홈 디렉터리(home directory)가 포함된 영구적 디스크(persistent disk)가 있는 Jenkins Deployment를 생성합니다. 영구적 디스크에 홈 디렉터리를 유지하면 Jenkins Master를 실행하는 Pod가 다운된 경우에도 중요한 설정(configuration) data가 유지됩니다.
kubectl apply : 클러스터의 다른 Pod에서 Jenkins Master에 액세스할 수 있게 하는 두 가지 service를 생성합니다.
- Nodeport service 포트 8080는 Pods 그리고 외부 사용자로부터 Jenkins 사용자 인터페이스에 액세스할 수 있게 해줍니다. 이 유형의 서비스는 HTTP 로드밸런서(Load Balancer)에 의해 로드 밸런싱됩니다.
- Cluster IP service 포트 50000은 Jenkins 사용자가 클러스터 내에서 Jenkins 마스터와 통신하는데 사용합니다.
Jenkins Deployment와 Service를 생성해봅시다.
$ kubectl apply -f jenkins/k8s/
pod의 상태(status)가 running인지 확인하기 위해 watch 명령어를 사용합니다.
$ watch -n 0.5 kubectl get pods -n jenkins
Machine-Type을 f1-micro로 진행시 Pod 할당에서 Schedulable 에러가 발생합니다.
No nodes are available that match all of the predicates: Insufficient cpu (2), Insufficient memory (5).
Machine type을 n1-standard-1으로 진행합시다.
Configuring HTTP load balancing
다음으로 Jenkins 사용자 인터페이스 서비스의 외부로드 균형 조정을 관리하는 ingress resource 를 만듭니다. ingress resource는 사용자와 Jenkins 사용자 인터페이스 서비스 간의 통신을 암호화(encrypt)하는 SSL terminator 역할을 합니다.
Jenkins 네임 스페이스에 서비스를 나열하여 서비스가 올바르게 설정되었는지 확인합니다.
$ kubectl get svc -n jenkins
jenkins-discovery와 jenkins-ui가 표시되는지 확인합니다.
SSL 인증서(certificate) 그리고 키(Key)를 생성합니다.
$ openssl req -x509 -nodes -days 365 -newkey rsa:2048 -keyout /tmp/tls.key -out /tmp/tls.crt -subj "/CN=jenkins/O=jenkins"
secret으로 Kubernetes로 인증서를 업로드합니다.
$ kubectl create secret generic tls --from-file=/tmp/tls.crt --from-file=/tmp/tls.key -n jenkins
ingress를 사용하는 HTTPS load balancer를 생성합니다.
$ kubectl apply -f jenkins/k8s/lb/ingress.yaml
Jenkins 연결하기
로드밸런서(Load Balancer) health 검사 상태를 확인합니다. 정상 상태로 완료될 때까지 백엔드(backend) field가 UNKNOWN, UNHEALTHY로 표시됩니다. 다음의 명령어를 반복하여 실행하여 HEALTHY로 표시될 때까지 기다립니다.
로드밸런서를 프로비저닝하고 상태 검사를 완료하는데 몇 분이 걸릴 수 있습니다.
$ watch -n 1 kubectl describe ingress jenkins --namespace jenkins
(10~15분 소요) backends 필드가 HEALTHY로 변경됩니다.
출력은 다음과 같습니다.
Name: jenkins
Namespace: jenkins
Address: xxx.xxx.xxx.xxx
Default backend: jenkins-ui:8080 (xxx.xxx.xxx.xxx:8080)
TLS:
tls terminates
Rules:
Host Path Backends
---- ---- --------
Annotations:
https-forwarding-rule: k8s-fws-jenkins-jenkins
https-target-proxy: k8s-tps-jenkins-jenkins
static-ip: k8s-fw-jenkins-jenkins
target-proxy: k8s-tp-jenkins-jenkins
url-map: k8s-um-jenkins-jenkins
backends: {"k8s-be-32371":"HEALTHY"}
백엔드가 정상적이면 다음의 명령을 실행하여 Jenkins의 URL과 암호를 얻습니다.
$ echo "Jenkins URL: https://`kubectl get ingress jenkins -n jenkins -o jsonpath='{.status.loadBalancer.ingress[0].ip}'`";
$ echo "Your username/password: jenkins/$PASSWORD"
브라우저에서 Jenkins URL을 방문합니다. URL이 안전하지 않으므로 고급을 클릭한 다음 [IP_ADDRESS](안전하지 않음)으로 클릭하여 진행합니다.
다음의 Jenkins web ui의 화면이 보입니다.
새 작업을 작성한 후 이전 단계에서 표시된 자격증명(credentials)로 로그인하려면 로그인을 누르십시오.
Google Cloud Console에서 확인한 username과 password를 입력합니다.
암호가 틀리다면 다음을 확인하고 패스워드 입력을 해주세요.ㅣ
$ cat jenkins/k8s/options
로그인이 된 화면입니다.
이제 Jenkins를 Kubernetes 클러스터에 설치했습니다. Jenkins는 다음 섹션에서 자동화 된 CI / CD 파이프 라인을 가동 할 것입니다.
Understanding the application
예제 응용프로그램(application)인 gceme를 지속적인 배포(Deployment) 파이프라인에 배포할 것입니다. application은 Go 언어로 작성되었으며, repo의 sample-app 디렉토리에 있습니다. Compute Engine 인스턴스에서 gceme 바이너리(binary)를 실행하면 app이 인스턴스(instance)의 메타데이터(metadata)를 정보 카드에 표시합니다.
application은 두 가지 작동 모드를 지원하며 microservice를 모방합니다.
- 백엔드(backend) 모드 : gceme는 포트 8080을 사용하며, Compute Engine 인스턴스 메타데이터를 JSON 형식으로 반환합니다.
- 프론트엔드(frontend) 모드 : gceme는 백엔드 gceme 서비스를 쿼리(query)하고 결과의 JSON을 사용자 인터페이스에 렌더링합니다.
Deploying the application
응용 프로그램을 두 개의 다른 환경에 배포합니다.
- Production : 사용자가 액세스하는 라이브 사이트입니다.
- Canary : 사용자 트래픽의 일부만 수신하는 소용량 사이트. 이 환경을 사용하여 모든 사용자에게 공개되기 전에 실시간 트래픽으로 소프트웨어의 유효성을 검사할수 있습니다.
Google Cloud Shell에서 sample-app 디렉토리로 이동합니다.
논리적으로 deployment를 격리하려면 Kubernetes namespace를 생성합니다.
$ cd sample-app
$ kubectl create ns production
production과 canary의 Deployment를 생성하고, kubectl apply 명령을 사용해 서비스를 생성합니다.
$ kubectl apply -f k8s/production -n production
$ kubectl apply -f k8s/canary -n production
$ kubectl apply -f k8s/services -n production
기본적으로 프런트 엔드의 복제본은 하나만 배포됩니다. kubectl scale 명령을 사용하여 적어도 4 개의 복제본이 항상 실행되고 있는지 확인합니다.
production의 프론트 엔드(front-end) 확장(scale up) :
$ kubectl scale deployment gceme-frontend-production -n production --replicas 4
이제 프론트엔드(frontend)에 5 개의 pd가 있고 프로덕션 traffic에 4 개, canary 릴리즈(releases)에 1 개가 있음을 확인하십시오 (canary release 변경은 사용자 중 20 %만이 영향을 미칩니다).
$ kubectl get pods -n production -l app=gceme -l role=frontend
또한 백엔드용(backend) 2개의 pod(production 1 pod, canary 1 pod)가 있는지 확인하십시오.
$ kubectl get pods -n production -l app=gceme -l role=backend
production 서비스에 대해 외부 IP를 검색해봅시다.
$ kubectl get service gceme-frontend -n production
1분 뒤에 EXTERNAL-IP에 고정 IP가 발급됩니다.
고정 IP로 이동하면 다음과 같은 사이트가 나옵니다.
나중에 사용할 수 있도록 프론트 엔드 서비스 로드밸런서(loadbalancer) IP를 환경 변수에 저장하십시오.
$ export FRONTEND_SERVICE_IP=$(kubectl get -o jsonpath="{.status.loadBalancer.ingress[0].ip}" --namespace=production services gceme-frontend)
브라우저에서 프론트엔드(frontend) 외부 IP 주소를 열어 두 서비스가 모두 작동하는지 확인하십시오. /version 경로를 사용하여 서비스의 버전(version) 출력을 확인하십시오. 1.0.0이 출력됩니다.
$ curl http://$FRONTEND_SERVICE_IP/version
sample-app 프로그램을 성공적으로 배포했습니다! 다음은 변경 사항을 지속적으로 안정적으로 배포하기위한 파이프 라인을 설정합니다.
Creating the Jenkins pipeline
sample app 소스 코드를 호스팅하는 저장소(repository) 만들기
gceme 샘플 앱의 복사본을 만들어 클라우드 소스 저장소(Cloud Source Repositories)로 푸시 합니다.
$ gcloud alpha source repos create default
Cloud Source Repositories API 승인
다시 실행해봅시다.
sample-app 디렉토리를 Git 저장소(repository)으로 초기화합니다.
$ git init
$ git config credential.helper gcloud.sh
git config를 통해 username과 email-address를 설정합니다.
$ git config --global user.email "[EMAIL_ADDRESS]"
$ git config --global user.name "[USERNAME]"
[PROJECT_ID]를 본인의 프로젝트 ID로 변경해주세요.
$ git remote add origin https://source.developers.google.com/p/[PROJECT_ID]/r/default
현재 sample-app에 있는 파일과 디렉토리를 전부 add하고, 변경 기록을 커밋하여 push 합니다.
$ git add .
$ git commit -m "Initial commit"
$ git push origin master
service account 자격증명(credentials) 추가하기
Jenkins가 코드 저장소에 액세스 할 수 있도록 자격 증명(credentials)을 구성하십시오. Jenkins는 클라우드 소스 저장소에서 코드를 다운로드하기 위해 클러스터의 서비스 계정 자격 증명을 사용합니다.
[step 1] Jenkins UI에서 왼쪽 네비게이션 메뉴에서 Credentials 을 클릭합니다.
[step 2] Jenkins의 top group을 클릭합니다.
[step 3] Global credentials(unrestricted) 클릭합니다.
[step 4] 왼쪽 네비게이션 메뉴에서 Add Credentials 버튼을 클릭합니다.
[step 5] 드롭다운 메뉴에서 Google Service Account from metadata를 선택하고 OK 버튼을 클릭합니다.
이제 2 가지의 글로벌 자격 증명(credentials)이 있습니다. 하나는 GCP 프로젝트 ID 이름을 가지고 있습니다.
새로운 Job 생성하기
Jenkins UI로 이동하여 다음 단계에 따라 pipeline 작업을 설정해봅시다.
[step 1] 왼쪽 네비게이션에서 Jenkins > New Item을 클릭합니다.
[step 2] 프로젝트 이름을 sample-app으로 지정한다음 Multibranch Pipeline 옵션을 선택하고 OK 버튼을 클릭합니다.
[step 3] 다음의 페이지에서 Branch Sources에서 Add Source를 선택하고 git을 선택합니다.
[step 4] Project Repository 필드에서 Cloud Source Repository에 있는 sample-app의 주소를 붙여넣기 합니다.
https://source.developers.google.com/p/[PROJECT_ID]/r/default
[step 5] Credentials에서는 드롭다운 메뉴에서 우리가 이전에 생성한 프로젝트 ID의 credentials를 선택합니다.
[step 6] Build Triggers에서는 Build Periodically 박스를 선택하고 안에 내용에 * * * * *(공백으로 구분된 별 다섯개)를 입력합니다. Jenkins는 code repository를 매 분마다 확인을 할 것입니다. 이 스케줄(schedule)은 CRON 명령어를 통해 사용됩니다.
[step 7] 마지막으로 우리가 설정해야 될 화면은 다음과 같습니다. Save 버튼을 클릭하여 저장합니다.
이 단계를 완료하면 "Branch indexing"이라는 작업이 실행됩니다. 이 메타 작업(meta-job)은 저장소(repository)의 branch를 식별하고 변경 사항이 기존 branch에서 발생하지 않았는지 확인합니다. 왼쪽 상단에서 sample-app을 클릭하면 마스터 작업이 표시됩니다.
자 이제 우리는 Jenkins의 Pipeline을 생성하였습니다.
Creating the development environment
개발 branche는 개발자가 실제 사이트에 통합하기 위해 제출하기 전에 코드 변경 사항을 테스트하는 데 사용하는 환경 집합입니다. 이러한 환경은 응용 프로그램의 축소 버전이지만 실제 환경과 동일한 메커니즘을 사용하여 배포(deploy)해야 합니다.
deployment branch 생성
feature branch에서 개발 환경을 생성하려면 Git 서버로 branch를 푸시(push)하고 Jenkins가 사용자 환경을 배포(deploy)할 수 있습니다.
deployment branch를 생성하고 Git server로 푸시합시다.
$ git checkout -b new-feature
Pipeline 정의(definition) 수정하기
파이프 라인을 정의하는 Jenkinsfile은 Jenkins Pipeline Groovy syntax 구문을 사용하여 작성됩니다. Jenkinsfile을 사용하면 전체 빌드 파이프 라인을 소스 코드와 함께 존재하는 단일 파일로 표현할 수 있습니다. 파이프 라인은 병렬화 및 수동 사용자 승인이 필요한 강력한 기능을 지원합니다.
파이프 라인이 예상대로 작동하려면 Jenkinsfile을 수정하여 프로젝트 ID를 설정해야합니다.
$ vi Jenkinsfile
Jenkinsfile 내용에서 project에 본인의 Project_ID로 수정합니다.
def project = 'REPLACE_WITH_YOUR_PROJECT_ID'
def appName = 'gceme'
def feSvcName = "${appName}-frontend"
def imageTag = "gcr.io/${project}/${appName}:${env.BRANCH_NAME}.${env.BUILD_NUMBER}"
저장합니다.
site 수정하기
application을 변경하는 방법을 보기 위해 gceme 카드를 파란색에서 주황색으로 변경합니다.
html.go 파일을 먼저 수정합시다.
$ ~/continuous-deployment-on-kubernetes/sample-app
$ vi html.go
<div class=”card blue”> 2개에서 card orange로 수정합시다.
<div class="card orange">
저장하고 다음은 main.go 파일을 수정합시다.
$ vi main.go
version을 1.0.0에서 2.0.0 으로 수정해봅시다.
const version string = "1.0.0"
const version string = "2.0.0"
저장합니다.
deployment 시작
변경 기록을 commit하고 push합니다.
$ git add Jenkinsfile html.go main.go
$ git commit -m "Version 2.0.0"
$ git push origin new-feature
개발 환경 빌드가 시작됩니다.
변경 사항이 Git 저장소(repository)로 push 된 후 Jenkins UI로 이동하여 new-feature branch에 대한 build가 시작되었음을 알 수 있습니다. 최대 1분 이상이 걸립니다.
빌드가 실행 된 후 Console output 버튼을 클릭해봅시다.
몇 분 동안 빌드의 출력을 추적하고, kubectl --namespace = new-feature apply … 메시지가 시작되는 지 관찰해봅시다. 이제 new-feature branch가 클러스터에 배포(deploy)됩니다.
개발 시나리오에서는 공용 로드밸런서를 사용하지 않습니다.애플리케션 보안을 위해 kubectl proxy 를 사용할 수 있습니다.
프록시(proxy)는 Kubernetes API를 사용하여 자신을 인증하고 서비스를 인터넷에 노출시키지 않고 로컬 컴퓨터의 요청을 클러스터의 서비스로 프록시합니다.
background에 proxy를 시작합니다.
$ kubectl proxy &
localhost에 요청을 보내고 kubectl 프록시가 서비스에 서비스를 전달하도록 하여 응용 프로그램에 액세스 할 수 있는지 확인하십시오.
$ curl http://localhost:8001/api/v1/proxy/namespaces/new-feature/services/gceme-frontend:80/version
현재 실행 중인 버전이 2.0.0으로 응답해야 합니다.
개발 환경(deployment environment)를 설정했습니다.
다음은 Kubernetes에 배포를 canary 릴리즈로 배포해봅시다.
Deploying a canary release
앱이 개발 환경에서 최신 코드를 실행하고 있음을 확인하였으므로 해당 코드를 canary 환경에 배포(deploy)합시다.
canary branch를 생성하고 Git 서버로 푸시(push)합시다.
$ git checkout -b canary
$ git push origin canary
Jenkins에서는 canary 파이프 라인이 시작되었음을 알 수 있습니다. 완료되면 서비스 URL을 확인하여 일부 트래픽이 새 버전에서 제공되고 있는지 확인할 수 있습니다. 버전 2.0.0을 반환하는 약 5 건의 요청 중 하나가 표시되어야합니다.
ort FRONTEND_SERVICE_IP=$(kubectl get -o jsonpath="{.status.loadBalancer.ingress[0].ip}" --namespace=production services gceme-frontend)
$ while true; do curl http://$FRONTEND_SERVICE_IP/version; sleep 1; done
우리는 canary release를 배포했습니다. 이제 production으로 배포해봅시다.
Deploying to production
이제 canary가 출시되었고, 사용자의 불만을 듣지 않아 production에 deploy 합시다.
canary branch를 master branch와 merge하고, Git 서버로 푸시합시다.
$ git checkout master
$ git merge canary
$ git push origin master
Jenkins에서는 Master Pipe line이 시작된 것을 확인할 수 있습니다.
완료되면 서비스 URL을 확인해 모든 트래픽이 새 버전인 2.0.0 으로 제공되는 것을 확인할 수 있습니다.
$ export FRONTEND_SERVICE_IP=$(kubectl get -o jsonpath="{.status.loadBalancer.ingress[0].ip}" --namespace=production services gceme-frontend)
$ while true; do curl http://$FRONTEND_SERVICE_IP/version; sleep 1; done
gceme application의 정보 카드를 표시하는 사이트로 확인하여 변경 사항을 확인해봅시다. 카드 색상이 주황색으로 변경되었습니다.
$ kubectl get service gceme-frontend -n production
'Google Cloud Platform' 카테고리의 다른 글
| Google Cloud ML Vision API를 이용한 이미지 텍스트 추출 그리고 번역을 위한 Translation API와 Natural Language API (1) | 2018.04.10 |
|---|---|
| Deployments 관리 Kubernetes in Google Cloud Platform (0) | 2018.04.08 |
| Docker Hadoop 클러스터 Hive 설치 (0) | 2018.03.28 |
| Orchestrating Google Cloud with Kubernetes (0) | 2018.03.12 |
| Google Cloud with Kubernetes (0) | 2018.03.09 |