Deployments 관리 Kubernetes in Google Cloud Platform

Orchestrating Google Cloud with Kubernetes
Jenkins Kubernetes Google Cloud
Introduction to deployments
이기종(Heterogeneous) 배포(deployment)에는 일반적으로 특정 기술 또는 운영상의 요구 사항을 해결하기 위해 두 개 이상의 고유 한 환경 또는 지역을 연결해야합니다. 이기종 배포는 배포의 특성에 따라 "하이브리드", "멀티 클라우드"또는 "공용 - 개인"이라고합니다. 예를 들어, 단일 클라우드 환경, 다중 공용 클라우드 환경 (하이브리드 또는 공용 - 개인) 또는 온 프레미스 및 공용 클라우드 환경의 조합.
단일 환경 또는 지역에서 배포하는 경우 다양한 비즈니스 및 기술적 과제가 발생할 수 있습니다.
- 최대화 된 자원 : 단일 환경, 특히 사내 구축 환경의 경우, 프로덕션 요구 사항을 충족시킬 수있는 컴퓨팅, 네트워킹 및 스토리지 리소스가 없을 수 있습니다.
- 제한된 지리적 도달 범위 : 단일 환경의 배치는 지리적으로 멀리 떨어져있는 사람들이 하나의 배치에 액세스 할 것을 요구합니다. 그들의 트래픽은 전 세계를 중심으로 여행 할 수 있습니다.
- 제한된 가용성 : 웹 규모의 트래픽 패턴은 애플리케이션이 내결함성과 탄력성을 유지하도록합니다.
- 공급 업체 고정 : 공급 업체 수준의 플랫폼 및 인프라 추상화로 인해 응용 프로그램을 포팅 할 수 없습니다.
- 유연하지 못한 리소스 : 리소스가 특정 컴퓨팅, 스토리지 또는 네트워킹 제품 세트로 제한 될 수 있습니다.
이기종 배포는 이러한 문제를 해결하는 데 도움이되지만 프로그래밍 방식의 결정적 프로세스와 절차를 사용하여 아키텍처를 구성해야합니다. 일회성 또는 임시 배포 절차로 인해 배포 또는 프로세스가 취약 해 지거나 오류가 발생하지 않을 수 있습니다. Ad-hoc 프로세스는 데이터를 손실하거나 트래픽을 삭제할 수 있습니다. 올바른 배포 프로세스는 반복 가능해야하며 프로비저닝, 구성 및 유지 관리를 관리하는 데 입증 된 방법을 사용해야합니다.
이기종 배포에 대한 세 가지 일반적인 시나리오로는 다중 클라우드 배포, 온 프레미스 데이터 사전 처리 및 CI / CD (Continuous Integration / Continuous Delivery) 프로세스가 있습니다.
Get sample code in the git repository
container 및 deployments 작성 및 실행을위한 샘플 코드를 가져옵니다.
$ git clone https://github.com/googlecodelabs/orchestrate-with-kubernetes.git
$ cd orchestrate-with-kubernetes/kubernetes

5개의 n1-standard-1 노드가 있는 클러스터(cluster)를 생성합니다. (완료하는데 몇 분이 걸립니다.)
$ gcloud container clusters create hello-world --num-nodes 5 --zone us-central1-f

Create a deployment
deployments/auth.yaml 파일을 업데이트합니다.
$ vi deployments/auth.yaml
Deployment의 container의 섹션에 있는 이미지를 다음과 같이 변경합니다.
...
containers:
- name: auth
image: kelseyhightower/auth:1.0.0
…

이제 간단한 Deployment를 생성해봅시다. deployment 설정 파일을 확인해봅시다.
$ cat deployments/auth.yaml

apiVersion: extensions/v1beta1
kind: Deployment
metadata:
name: auth
spec:
replicas: 1
template:
metadata:
labels:
app: auth
track: stable
spec:
containers:
- name: auth
image: "kelseyhightower/auth:1.0.0"
ports:
- name: http
containerPort: 80
- name: health
containerPort: 81
...
replica 그리고 버전 1.0.0의 인증(auth) 컨테이너를 사용하고 있습니다.
auth 배치(deployment)를 작성하기 위해 kubectl create 명령을 실행하면 Deployment manifest의 데이터를 따르는 하나의 pod가 작성됩니다. 즉, 복제본 필드에 지정된 번호를 변경하여 포드 (Pod)의 수를 조정할 수 있습니다.
kubectl create를 사용하여 Deployment 객체를 만듭니다.
$ kubectl create -f deployments/auth.yaml
Deployment를 생성한 후에 잘 생성되었는지 확인할 수 있습니다.
$ kubectl get deployments

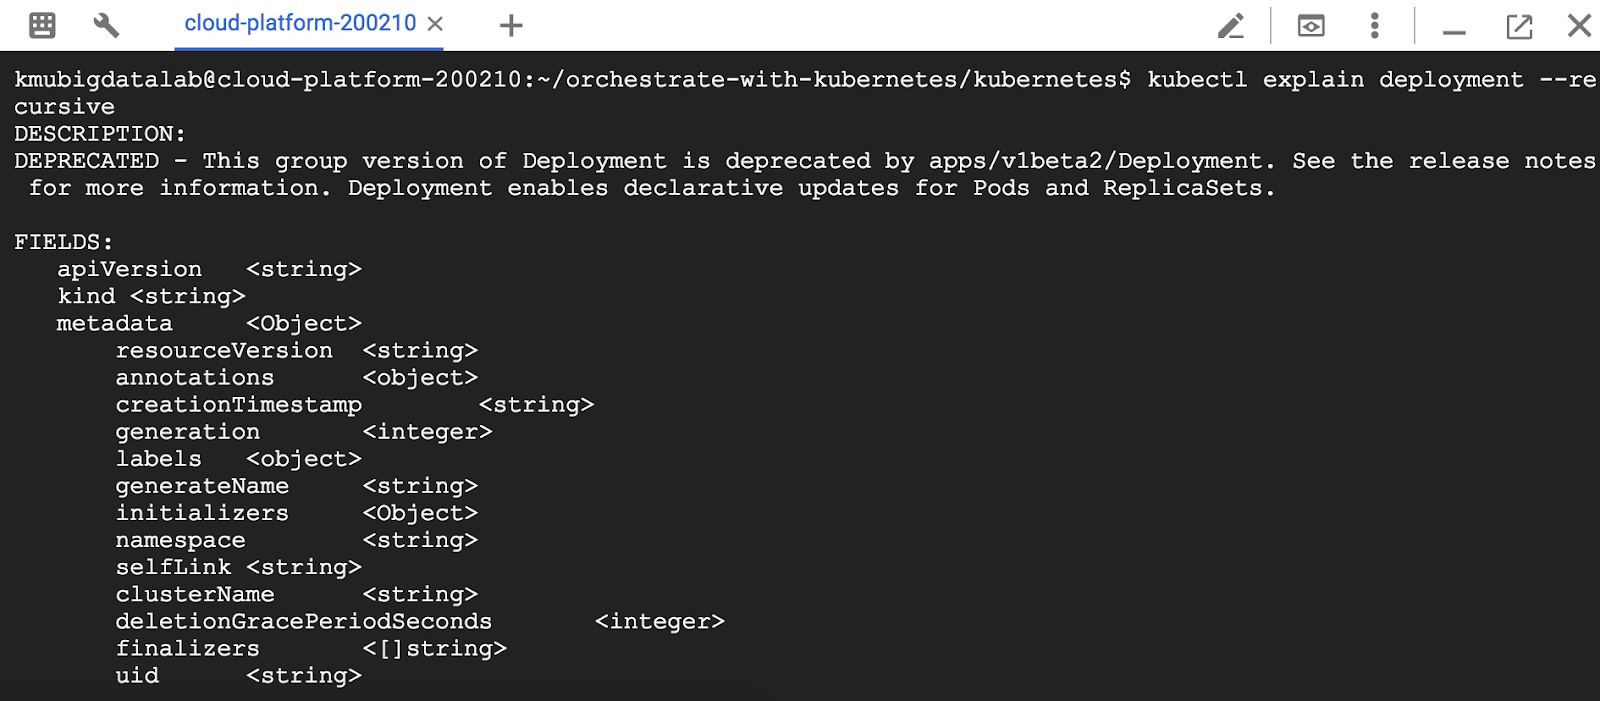
먼저 Deployment 객체를 살펴보겠습니다. kubectl explain 명령어는 Deployment 객체에 대해 알려줍니다.
$ kubectl explain deployment

또한 --recursive 옵션을 사용해 모든 필드를 살펴볼 수 있습니다.
$ kubectl explain deployment --recursive
Deployment 객체의 구조를 이해하고, 개별 필드의 기능을 이해하는 데 도움이 됩니다.
$ kubectl explain deployment.metadata.name

Deployment가 생성되면, Kubernetes는 Deployment의 ReplicaSet을 생성합니다.
$ kubectl get replicasets
auth-xxxxx와 같은 이름으로 ReplicaSet이 표시되어야 합니다.
마지막으로 Deployment의 일부로 생성된 Pod를 볼 수 있습니다. 단일 Pod는 ReplicaSet이 생성될 때 Kubernetes에 의해 생성됩니다.
$ kubectl get pods

이제 auth Deployment를 위한 Service를 만들 차례입니다. 서비스 매니페스트 파일을 이미 보았으므로 여기서 자세히 설명하지 않겠습니다. kubectl create 명령을 사용하여 인증 서비스를 작성합시다.
$ kubectl create -f services/auth.yaml
$kubectl create -f deployments/hello.yaml
$kubectl create -f services/hello.yaml

프론트 엔드 Deployment 를 만들고 노출(expose) 합니다.
$ kubectl create secret generic tls-certs --from-file tls/
$ kubectl create configmap nginx-frontend-conf --from-file=nginx/frontend.conf
$ kubectl create -f deployments/frontend.yaml
$ kubectl create -f services/frontend.yaml

프론트엔드에 대한 ConfigMap을 생성하였습니다.
외부 IP를 잡아서 프론트엔드와 상호 작용하고 curl을 합니다.
$ kubectl get services frontend
$ curl -ks https://EXTERNAL-IP
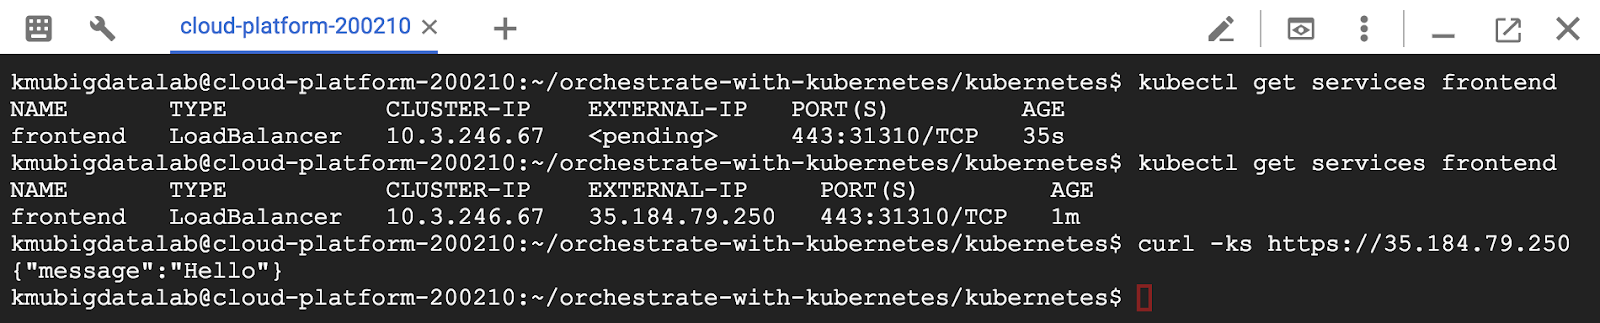
우리는 hello라는 응답을 받게 됩니다.
kubectl의 출력 템플릿 기능을 사용해 curl을 사용할 수 있습니다.
$ curl -ks https://`kubectl get svc frontend -o=jsonpath="{.status.loadBalancer.ingress[0].ip}"`

Scale a Deployment
Deployment를 만들었으므로 확장할 수 있습니다. spec.replicas 필드를 업데이트하여이를 수행하십시오. kubectl explain 명령을 다시 사용하여 이 필드에 대한 설명을 볼 수 있습니다.
$ kubectl explain deployment.spec.replicas

replica 필드는 kubectl scale 명령을 사용하여 쉽게 업데이트 할 수 있습니다 :
$ kubectl scale deployment hello --replicas=5
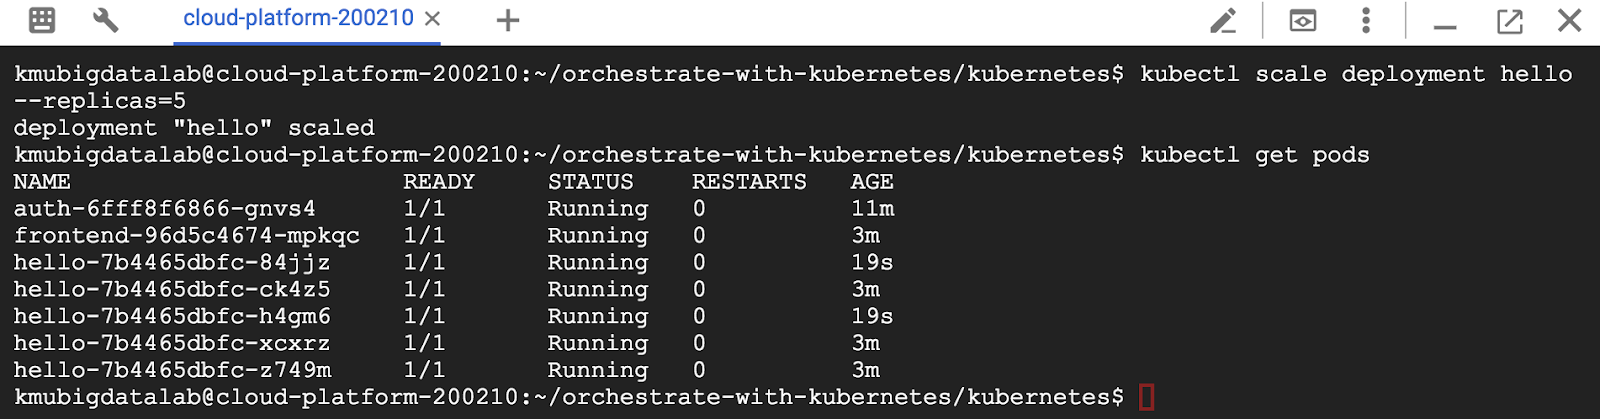
새로운 Pod가 모두 시작 되려면 1~2분 정도 걸릴 수 있습니다.
Deployment가 업데이트 된 후 Kubernetes는 자동으로 관련 ReplicaSet을 업데이트하고 새 창을 시작하여 총 Pod 수가 5가 되도록합니다.
이제 인증 실행을위한 5 개의 Pod가 있는지 확인하십시오.
$ kubectl get pods | grep hello- | wc -l
자 이제 다시 애플리케이션을 축소합니다.
$ kubectl scale deployment hello --replicas=3

다시 한번, Pod의 수를 확인해봅시다.
$ kubectl get pods | grep hello- | wc -l

Kubernetes Deployment 및 Pod 그룹을 관리하고 확장하는 방법에 대해 배웠습니다.
Rolling update
Deployment는 롤링 업데이트 메커니즘을 통해 이미지를 새 버전으로 업데이트하는 것을 지원합니다. Deployment가 새 버전으로 업데이트되면 새 ReplicaSet을 만들고 이전 ReplicaSet의 복제본을 줄이면 새 ReplicaSet의 복제본 수가 천천히 증가합니다.

Trigger a rolling update
Deployment를 업데이트하기 위해서 다음의 명령어를 실행합니다.
$ kubectl edit deployment hello

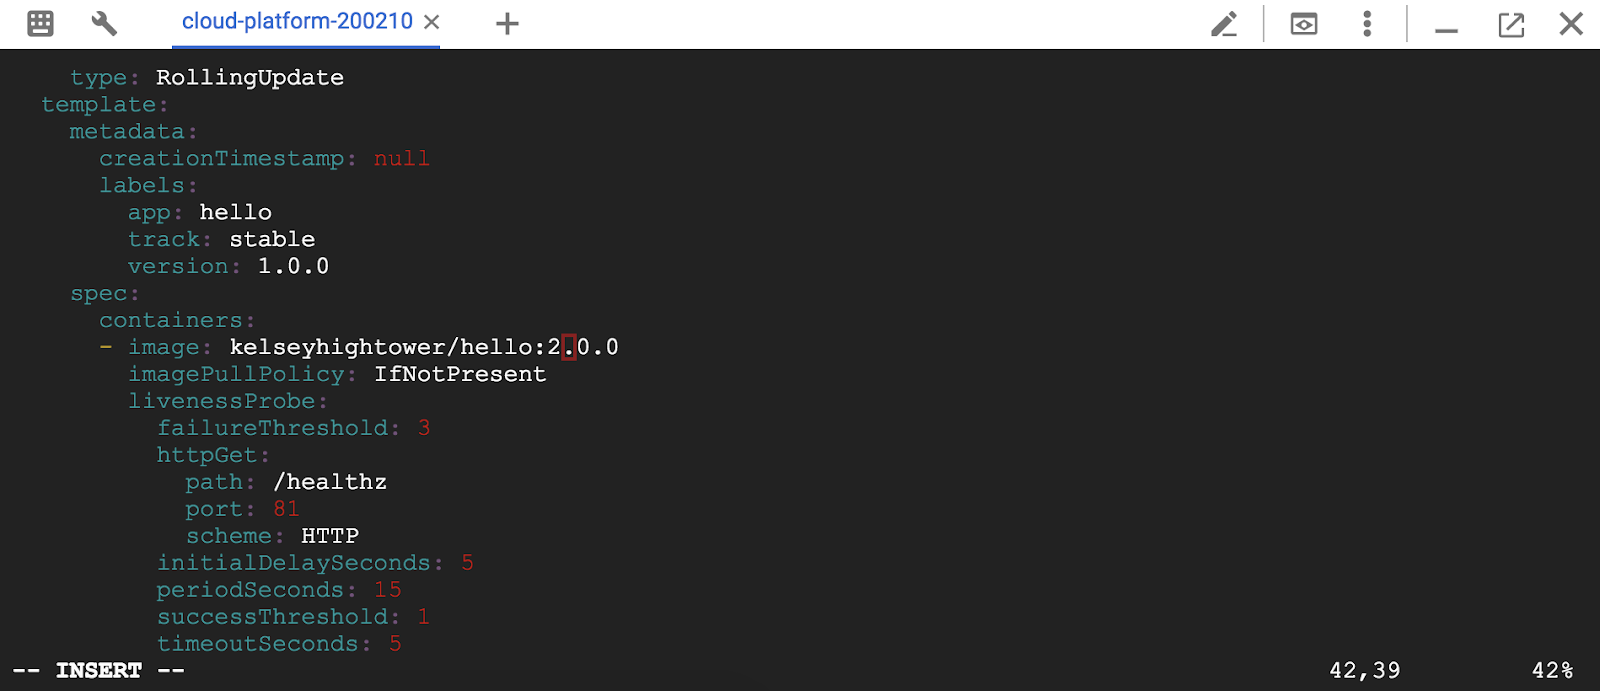
Deployment의 컨테이너(container) 섹션에 있는 이미지를 변경합니다.
...
containers:
- name: hello
image: kelseyhightower/hello:2.0.0
...
저장하고 종료합니다.
편집기에서 저장하면 업데이트된 deployment가 클러스터(cluster)에 저장되고 Kubernetes는 롤링 업데이트를 시작합니다.
Kubernetes가 생성한 새로운 ReplicaSet을 참조합니다.
$ kubectl get replicaset

Rollout 기록에서 새로운 항목을 볼 수도 있습니다.
$ kubectl rollout history deployment/hello

Pause a rolling update
실행 중인 Rollout에 문제가 있을 경우, 일시 중지하여 업데이트를 중지해야 합니다.
$ kubectl rollout pause deployment/hello
Rollout 의 현재 상태를 확인합니다.
$ kubectl rollout status deployment/hello

또한 Pod에서 직접 확인할 수 있습니다.
$ kubectl get pods -o jsonpath --template='{range .items[*]}{.metadata.name}{"\t"}{"\t"}{.spec.containers[0].image}{"\n"}{end}'

Resume a rolling update
Roll-out이 일시 중지되었으므로 일부 Pod는 새 버전에 있고 일부 Pod는 이전 버전에 있습니다. resume 명령을 통해 Roll-out 을 계속할 수 있습니다.
$ kubectl rollout resume deployment/hello
Rollout이 완료되면 status 명령을 실행할 때 다음이 표시됩니다.
$ kubectl rollout status deployment/hello

Rollback an update
새 버전에서 버그가 발견되었다고 가정합니다. 새 버전에는 문제가 있는 것으로 간주되므로 새 Pod에 연결된 모든 사용자는 이러한 문제를 경험하게됩니다.
이전 버전으로 Rollback하여 제대로 수정된 버전을 조사한 다음 릴리스 할 수 있습니다.
Rollout 명령을 사용하여 이전 버전으로 Rollback하십시오.
$ kubectl rollout undo deployment/hello
기록에서 Rollback을 확인합시다.
$ kubectl rollout history deployment/hello

마지막으로 모든 Pod가 이전 버전으로 Rollback되었는지 확인합니다.
$ kubectl get pods -o jsonpath --template='{range .items[*]}{.metadata.name}{"\t"}{"\t"}{.spec.containers[0].image}{"\n"}{end}'

좋습니다! Kubernetes Deployment에 대한 업데이트 rolling과 중단하는 시간 없이 application을 업데이트하는 방법을 배웠습니다.
Canary deployment
Production 환경에서 사용자의 하위 집합을 사용하여 새 Deployment를 테스트하려면 Canary deployments를 사용하십시오. Canary deployments를 사용하면 새로운 릴리스(release)와 관련된 위험을 완화하기 위해 사용자의 작은 하위 집합에 대한 변경 사항을 릴리스 할 수 있습니다.
Create a canary deployment
Canary deployments는 새 버전과의 별도 배치와 Canary deployments뿐만 아니라 정상적이고 안정적인 deployment를 모두 목표로하는 서비스로 구성됩니다.

먼저, 새 버전에 대한 새 Canary Deployment를 생성합니다.
$ cat deployments/hello-canary.yaml

apiVersion: extensions/v1beta1
kind: Deployment
metadata:
name: hello-canary
spec:
replicas: 1
template:
metadata:
labels:
app: hello
track: canary
# Use ver 1.0.0 so it matches version on service selector
version: 1.0.0
spec:
containers:
- name: hello
image: kelseyhightower/hello:2.0.0
ports:
- name: http
containerPort: 80
- name: health
containerPort: 81
...
버전을 1.0.0으로 업데이트합니다.
이제 Canary deployment를 작성합니다.
$ kubectl create -f deployments/hello-canary.yaml
Canary deployment가 작성되면 hello와 hello-canary의 두 가지 배치가 있어야합니다. 이 kubectl 명령으로 확인하십시오.
$ kubectl get deployments

hello 서비스에서 selector는 prod deployment 및 canary deployment 모두에서 Pod와 일치하는 app : hello selector를 사용합니다. 그러나 canary deployment에서는 Pod 수가 적기 때문에 사용자 수가 줄어들 수 있습니다.
Verify the canary deployment
요청(request)에 의해 제공되는 hello 버전을 확인할 수 있습니다.
$ curl -ks https://`kubectl get svc frontend -o=jsonpath="{.status.loadBalancer.ingress[0].ip}"`/version

여러번 실행하면 hello 1.0.0에 의해 제공되는 요청(request)의 일부와 2.0.0에 의해 제공되는 ¼=25% 을 볼 수 있습니다.
Canary deployments in production - session affinity
이 포스트에서는 Nginx 서비스에 전송된 각 요청에 카나리아 배포가 제공 될 수있는 기회가 있었습니다. 하지만 사용자가 Canary deployment를 통해 서비스를 받지 못하도록 하려면 어떻게 해야 할까요? 유스 케이스는 응용 프로그램의 UI가 변경되어 사용자를 혼동하지 않을 수 있다는 것입니다. 이와 같은 경우에는 사용자가 deployment에 고정되어야 합니다.
session affinity가 있는 서비스를 만들어 이 작업을 수행 할 수 있습니다. 이렇게하면 동일한 사용자가 항상 동일한 버전에서 게재됩니다. 아래 예에서 서비스는 이전과 동일하지만 새로운 session affinity 필드가 추가되어 Client IP로 설정됩니다. 동일한 IP 주소를 가진 모든 클라이언트는 동일한 버전의 hello 응용 프로그램으로 요청을 보냅니다.
kind: Service
apiVersion: v1
metadata:
name: "hello"
spec:
sessionAffinity: ClientIP
selector:
app: "hello"
ports:
- protocol: "TCP"
port: 80
targetPort: 80
Clean up
이제 Canary deployment가 제대로 작동하는지 확인 했으므로 이제 Canary deployment와 삭제된 서비스를 삭제할 수 있습니다.
$ kubectl delete deployment hello-canary

Canary deployment와 실제 환경에서 새 버전의 application을 테스트 하는 방법을 배웠습니다.
Blue-green deployments
Rolling 업데이트는 최소한의 오버 헤드, 최소한의 성능 영향 및 최소한의 중단 시간으로 천천히 응용 프로그램을 배포 할 수 있기 때문에 이상적입니다. 로드 밸런서(load balancer)가 완전히 배포된 후에만 새 버전을 가리 키도록 로드 밸런서를 수정하는 것이 유익한 경우가 있습니다. 이 경우 Blue-green deployment가 필요합니다.
Kubernetes는 두 가지 별도의 배포를 만들어 이를 수행합니다. 하나는 이전의 "Blue" 버전용이고 다른 하나는 새로운 "Green" 버전 용입니다. "Blue" 버전에는 기존 hello 배포를 사용하십시오. 배치는 라우터 역할을하는 서비스를 통해 액세스됩니다. 새로운 "Green"버전이 실행되면 서비스를 업데이트하여 해당 버전을 사용하도록 전환합니다.

Blue-green deployment의 주요 단점은 응용 프로그램을 호스팅하는 데 필요한 최소한 2배의 리소스(resource)가 클러스터에 있어야한다는 것입니다. 한 번에 두 버전의 응용 프로그램을 배포(deployment)하기 전에 클러스터(cluster)에 충분한 리소스가 있는지 확인합니다.
The Service
기존 hello 서비스를 사용하지만 Selector에 app : hello, version : 1.0.0 이 있도록 업데이트하십시오. Selector는 기존의 "Blue" deployment와 일치합니다. 그러나 다른 버전을 사용하기 때문에 "Green" deployment와 일치하지 않습니다.
먼저 서비스를 업데이트하십시오.
$ kubectl apply -f services/hello-blue.yaml

Updating using Blue-Green Deployment
Blue-green deployment 스타일을 지원하기 위해 새로운 버전의 새로운 "green" deployment를 작성합니다. green deployment는 버전 레이블과 이미지 경로를 업데이트합니다.
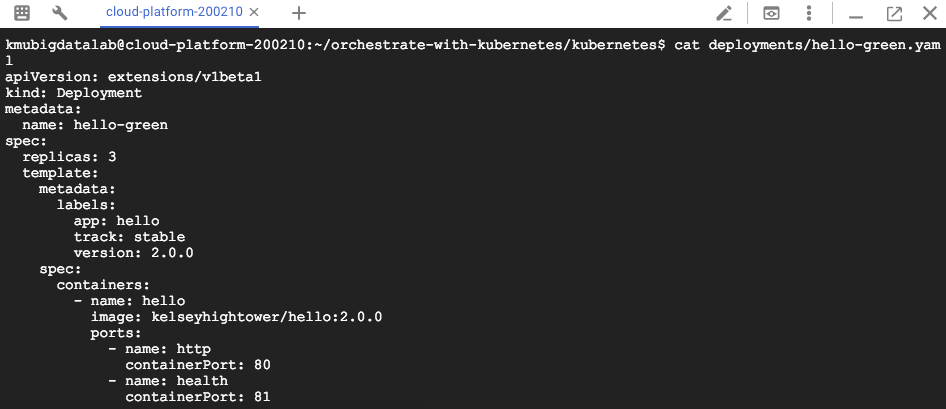
$ cat deployments/hello-green.yaml
apiVersion: extensions/v1beta1
kind: Deployment
metadata:
name: hello-green
spec:
replicas: 3
template:
metadata:
labels:
app: hello
track: stable
version: 2.0.0
spec:
containers:
- name: hello
image: kelseyhightower/hello:2.0.0
ports:
- name: http
containerPort: 80
- name: health
containerPort: 81
resources:
limits:
cpu: 0.2
memory: 10Mi
livenessProbe:
httpGet:
path: /healthz
port: 81
scheme: HTTP
initialDelaySeconds: 5
periodSeconds: 15
timeoutSeconds: 5
readinessProbe:
httpGet:
path: /readiness
port: 81
scheme: HTTP
initialDelaySeconds: 5
timeoutSeconds: 1
“Green” deployment를 생성합니다.
$ kubectl create -f deployments/hello-green.yaml
green deployment가 있고 제대로 시작된 경우 현재 1.0.0 버전이 아직 사용되고 있는지 확인하십시오.
$ curl -ks https://`kubectl get svc frontend -o=jsonpath="{.status.loadBalancer.ingress[0].ip}"`/version

새로운 버전을 가르키도록 서비스를 업데이트 합니다.
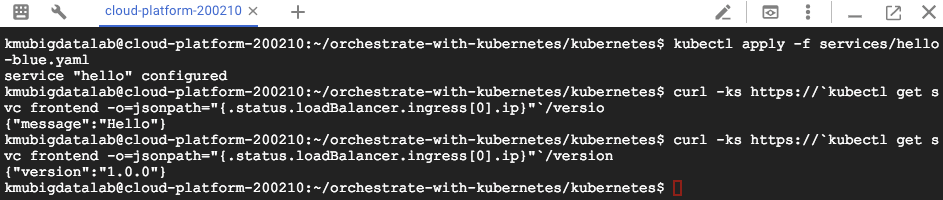
$ kubectl apply -f services/hello-green.yaml
서비스가 업데이트되면 즉시 “Green” deployment가 사용됩니다. 이제 새 버전이 항상 사용되고 있는지 확인할 수 있습니다.
$ curl -ks https://`kubectl get svc frontend -o=jsonpath="{.status.loadBalancer.ingress[0].ip}"`/version

Blue-Green Rollback
필요한 경우 같은 방법으로 이전 버전으로 Rollback 할 수 있습니다. "Blue" deployment가 아직 실행 중이지만 서비스를 이전 버전으로 다시 업데이트하면됩니다.
$ kubectl apply -f services/hello-blue.yaml
일단 서비스를 업데이트하면 Rollback이 성공적으로 완료됩니다. 다시 올바른 버전이 사용되고 있는지 확인하십시오.
$ curl -ks https://`kubectl get svc frontend -o=jsonpath="{.status.loadBalancer.ingress[0].ip}"`/version
훌륭합니다. 지금까지 Kubernetes를 통해 업데이트 배포하는 방법에 대해 배웠습니다.
'Google Cloud Platform' 카테고리의 다른 글
| Google Cloud Platform 이용한 텍스트 카테고리 분류 Natural Language API (1) | 2018.04.10 |
|---|---|
| Google Cloud ML Vision API를 이용한 이미지 텍스트 추출 그리고 번역을 위한 Translation API와 Natural Language API (1) | 2018.04.10 |
| Jenkins Kubernetes Google Cloud (2) | 2018.04.01 |
| Docker Hadoop 클러스터 Hive 설치 (0) | 2018.03.28 |
| Orchestrating Google Cloud with Kubernetes (0) | 2018.03.12 |
Deployments 관리 Kubernetes in Google Cloud Platform
Orchestrating Google Cloud with Kubernetes
Jenkins Kubernetes Google Cloud
Introduction to deployments
이기종(Heterogeneous) 배포(deployment)에는 일반적으로 특정 기술 또는 운영상의 요구 사항을 해결하기 위해 두 개 이상의 고유 한 환경 또는 지역을 연결해야합니다. 이기종 배포는 배포의 특성에 따라 "하이브리드", "멀티 클라우드"또는 "공용 - 개인"이라고합니다. 예를 들어, 단일 클라우드 환경, 다중 공용 클라우드 환경 (하이브리드 또는 공용 - 개인) 또는 온 프레미스 및 공용 클라우드 환경의 조합.
단일 환경 또는 지역에서 배포하는 경우 다양한 비즈니스 및 기술적 과제가 발생할 수 있습니다.
- 최대화 된 자원 : 단일 환경, 특히 사내 구축 환경의 경우, 프로덕션 요구 사항을 충족시킬 수있는 컴퓨팅, 네트워킹 및 스토리지 리소스가 없을 수 있습니다.
- 제한된 지리적 도달 범위 : 단일 환경의 배치는 지리적으로 멀리 떨어져있는 사람들이 하나의 배치에 액세스 할 것을 요구합니다. 그들의 트래픽은 전 세계를 중심으로 여행 할 수 있습니다.
- 제한된 가용성 : 웹 규모의 트래픽 패턴은 애플리케이션이 내결함성과 탄력성을 유지하도록합니다.
- 공급 업체 고정 : 공급 업체 수준의 플랫폼 및 인프라 추상화로 인해 응용 프로그램을 포팅 할 수 없습니다.
- 유연하지 못한 리소스 : 리소스가 특정 컴퓨팅, 스토리지 또는 네트워킹 제품 세트로 제한 될 수 있습니다.
이기종 배포는 이러한 문제를 해결하는 데 도움이되지만 프로그래밍 방식의 결정적 프로세스와 절차를 사용하여 아키텍처를 구성해야합니다. 일회성 또는 임시 배포 절차로 인해 배포 또는 프로세스가 취약 해 지거나 오류가 발생하지 않을 수 있습니다. Ad-hoc 프로세스는 데이터를 손실하거나 트래픽을 삭제할 수 있습니다. 올바른 배포 프로세스는 반복 가능해야하며 프로비저닝, 구성 및 유지 관리를 관리하는 데 입증 된 방법을 사용해야합니다.
이기종 배포에 대한 세 가지 일반적인 시나리오로는 다중 클라우드 배포, 온 프레미스 데이터 사전 처리 및 CI / CD (Continuous Integration / Continuous Delivery) 프로세스가 있습니다.
Get sample code in the git repository
container 및 deployments 작성 및 실행을위한 샘플 코드를 가져옵니다.
$ git clone https://github.com/googlecodelabs/orchestrate-with-kubernetes.git
$ cd orchestrate-with-kubernetes/kubernetes
5개의 n1-standard-1 노드가 있는 클러스터(cluster)를 생성합니다. (완료하는데 몇 분이 걸립니다.)
$ gcloud container clusters create hello-world --num-nodes 5 --zone us-central1-f
Create a deployment
deployments/auth.yaml 파일을 업데이트합니다.
$ vi deployments/auth.yaml
Deployment의 container의 섹션에 있는 이미지를 다음과 같이 변경합니다.
...
containers:
- name: auth
image: kelseyhightower/auth:1.0.0
…
이제 간단한 Deployment를 생성해봅시다. deployment 설정 파일을 확인해봅시다.
$ cat deployments/auth.yaml
apiVersion: extensions/v1beta1
kind: Deployment
metadata:
name: auth
spec:
replicas: 1
template:
metadata:
labels:
app: auth
track: stable
spec:
containers:
- name: auth
image: "kelseyhightower/auth:1.0.0"
ports:
- name: http
containerPort: 80
- name: health
containerPort: 81
...
replica 그리고 버전 1.0.0의 인증(auth) 컨테이너를 사용하고 있습니다.
auth 배치(deployment)를 작성하기 위해 kubectl create 명령을 실행하면 Deployment manifest의 데이터를 따르는 하나의 pod가 작성됩니다. 즉, 복제본 필드에 지정된 번호를 변경하여 포드 (Pod)의 수를 조정할 수 있습니다.
kubectl create를 사용하여 Deployment 객체를 만듭니다.
$ kubectl create -f deployments/auth.yaml
Deployment를 생성한 후에 잘 생성되었는지 확인할 수 있습니다.
$ kubectl get deployments
먼저 Deployment 객체를 살펴보겠습니다. kubectl explain 명령어는 Deployment 객체에 대해 알려줍니다.
$ kubectl explain deployment
또한 --recursive 옵션을 사용해 모든 필드를 살펴볼 수 있습니다.
$ kubectl explain deployment --recursive
Deployment 객체의 구조를 이해하고, 개별 필드의 기능을 이해하는 데 도움이 됩니다.
$ kubectl explain deployment.metadata.name
Deployment가 생성되면, Kubernetes는 Deployment의 ReplicaSet을 생성합니다.
$ kubectl get replicasets
auth-xxxxx와 같은 이름으로 ReplicaSet이 표시되어야 합니다.
마지막으로 Deployment의 일부로 생성된 Pod를 볼 수 있습니다. 단일 Pod는 ReplicaSet이 생성될 때 Kubernetes에 의해 생성됩니다.
$ kubectl get pods
이제 auth Deployment를 위한 Service를 만들 차례입니다. 서비스 매니페스트 파일을 이미 보았으므로 여기서 자세히 설명하지 않겠습니다. kubectl create 명령을 사용하여 인증 서비스를 작성합시다.
$ kubectl create -f services/auth.yaml
$kubectl create -f deployments/hello.yaml
$kubectl create -f services/hello.yaml
프론트 엔드 Deployment 를 만들고 노출(expose) 합니다.
$ kubectl create secret generic tls-certs --from-file tls/
$ kubectl create configmap nginx-frontend-conf --from-file=nginx/frontend.conf
$ kubectl create -f deployments/frontend.yaml
$ kubectl create -f services/frontend.yaml
프론트엔드에 대한 ConfigMap을 생성하였습니다.
외부 IP를 잡아서 프론트엔드와 상호 작용하고 curl을 합니다.
$ kubectl get services frontend
$ curl -ks https://EXTERNAL-IP
우리는 hello라는 응답을 받게 됩니다.
kubectl의 출력 템플릿 기능을 사용해 curl을 사용할 수 있습니다.
$ curl -ks https://`kubectl get svc frontend -o=jsonpath="{.status.loadBalancer.ingress[0].ip}"`
Scale a Deployment
Deployment를 만들었으므로 확장할 수 있습니다. spec.replicas 필드를 업데이트하여이를 수행하십시오. kubectl explain 명령을 다시 사용하여 이 필드에 대한 설명을 볼 수 있습니다.
$ kubectl explain deployment.spec.replicas
replica 필드는 kubectl scale 명령을 사용하여 쉽게 업데이트 할 수 있습니다 :
$ kubectl scale deployment hello --replicas=5
새로운 Pod가 모두 시작 되려면 1~2분 정도 걸릴 수 있습니다.
Deployment가 업데이트 된 후 Kubernetes는 자동으로 관련 ReplicaSet을 업데이트하고 새 창을 시작하여 총 Pod 수가 5가 되도록합니다.
이제 인증 실행을위한 5 개의 Pod가 있는지 확인하십시오.
$ kubectl get pods | grep hello- | wc -l
자 이제 다시 애플리케이션을 축소합니다.
$ kubectl scale deployment hello --replicas=3
다시 한번, Pod의 수를 확인해봅시다.
$ kubectl get pods | grep hello- | wc -l
Kubernetes Deployment 및 Pod 그룹을 관리하고 확장하는 방법에 대해 배웠습니다.
Rolling update
Deployment는 롤링 업데이트 메커니즘을 통해 이미지를 새 버전으로 업데이트하는 것을 지원합니다. Deployment가 새 버전으로 업데이트되면 새 ReplicaSet을 만들고 이전 ReplicaSet의 복제본을 줄이면 새 ReplicaSet의 복제본 수가 천천히 증가합니다.
Trigger a rolling update
Deployment를 업데이트하기 위해서 다음의 명령어를 실행합니다.
$ kubectl edit deployment hello
Deployment의 컨테이너(container) 섹션에 있는 이미지를 변경합니다.
...
containers:
- name: hello
image: kelseyhightower/hello:2.0.0
...
저장하고 종료합니다.
편집기에서 저장하면 업데이트된 deployment가 클러스터(cluster)에 저장되고 Kubernetes는 롤링 업데이트를 시작합니다.
Kubernetes가 생성한 새로운 ReplicaSet을 참조합니다.
$ kubectl get replicaset
Rollout 기록에서 새로운 항목을 볼 수도 있습니다.
$ kubectl rollout history deployment/hello
Pause a rolling update
실행 중인 Rollout에 문제가 있을 경우, 일시 중지하여 업데이트를 중지해야 합니다.
$ kubectl rollout pause deployment/hello
Rollout 의 현재 상태를 확인합니다.
$ kubectl rollout status deployment/hello
또한 Pod에서 직접 확인할 수 있습니다.
$ kubectl get pods -o jsonpath --template='{range .items[*]}{.metadata.name}{"\t"}{"\t"}{.spec.containers[0].image}{"\n"}{end}'
Resume a rolling update
Roll-out이 일시 중지되었으므로 일부 Pod는 새 버전에 있고 일부 Pod는 이전 버전에 있습니다. resume 명령을 통해 Roll-out 을 계속할 수 있습니다.
$ kubectl rollout resume deployment/hello
Rollout이 완료되면 status 명령을 실행할 때 다음이 표시됩니다.
$ kubectl rollout status deployment/hello
Rollback an update
새 버전에서 버그가 발견되었다고 가정합니다. 새 버전에는 문제가 있는 것으로 간주되므로 새 Pod에 연결된 모든 사용자는 이러한 문제를 경험하게됩니다.
이전 버전으로 Rollback하여 제대로 수정된 버전을 조사한 다음 릴리스 할 수 있습니다.
Rollout 명령을 사용하여 이전 버전으로 Rollback하십시오.
$ kubectl rollout undo deployment/hello
기록에서 Rollback을 확인합시다.
$ kubectl rollout history deployment/hello
마지막으로 모든 Pod가 이전 버전으로 Rollback되었는지 확인합니다.
$ kubectl get pods -o jsonpath --template='{range .items[*]}{.metadata.name}{"\t"}{"\t"}{.spec.containers[0].image}{"\n"}{end}'
좋습니다! Kubernetes Deployment에 대한 업데이트 rolling과 중단하는 시간 없이 application을 업데이트하는 방법을 배웠습니다.
Canary deployment
Production 환경에서 사용자의 하위 집합을 사용하여 새 Deployment를 테스트하려면 Canary deployments를 사용하십시오. Canary deployments를 사용하면 새로운 릴리스(release)와 관련된 위험을 완화하기 위해 사용자의 작은 하위 집합에 대한 변경 사항을 릴리스 할 수 있습니다.
Create a canary deployment
Canary deployments는 새 버전과의 별도 배치와 Canary deployments뿐만 아니라 정상적이고 안정적인 deployment를 모두 목표로하는 서비스로 구성됩니다.
먼저, 새 버전에 대한 새 Canary Deployment를 생성합니다.
$ cat deployments/hello-canary.yaml
apiVersion: extensions/v1beta1
kind: Deployment
metadata:
name: hello-canary
spec:
replicas: 1
template:
metadata:
labels:
app: hello
track: canary
# Use ver 1.0.0 so it matches version on service selector
version: 1.0.0
spec:
containers:
- name: hello
image: kelseyhightower/hello:2.0.0
ports:
- name: http
containerPort: 80
- name: health
containerPort: 81
...
버전을 1.0.0으로 업데이트합니다.
이제 Canary deployment를 작성합니다.
$ kubectl create -f deployments/hello-canary.yaml
Canary deployment가 작성되면 hello와 hello-canary의 두 가지 배치가 있어야합니다. 이 kubectl 명령으로 확인하십시오.
$ kubectl get deployments
hello 서비스에서 selector는 prod deployment 및 canary deployment 모두에서 Pod와 일치하는 app : hello selector를 사용합니다. 그러나 canary deployment에서는 Pod 수가 적기 때문에 사용자 수가 줄어들 수 있습니다.
Verify the canary deployment
요청(request)에 의해 제공되는 hello 버전을 확인할 수 있습니다.
$ curl -ks https://`kubectl get svc frontend -o=jsonpath="{.status.loadBalancer.ingress[0].ip}"`/version
여러번 실행하면 hello 1.0.0에 의해 제공되는 요청(request)의 일부와 2.0.0에 의해 제공되는 ¼=25% 을 볼 수 있습니다.
Canary deployments in production - session affinity
이 포스트에서는 Nginx 서비스에 전송된 각 요청에 카나리아 배포가 제공 될 수있는 기회가 있었습니다. 하지만 사용자가 Canary deployment를 통해 서비스를 받지 못하도록 하려면 어떻게 해야 할까요? 유스 케이스는 응용 프로그램의 UI가 변경되어 사용자를 혼동하지 않을 수 있다는 것입니다. 이와 같은 경우에는 사용자가 deployment에 고정되어야 합니다.
session affinity가 있는 서비스를 만들어 이 작업을 수행 할 수 있습니다. 이렇게하면 동일한 사용자가 항상 동일한 버전에서 게재됩니다. 아래 예에서 서비스는 이전과 동일하지만 새로운 session affinity 필드가 추가되어 Client IP로 설정됩니다. 동일한 IP 주소를 가진 모든 클라이언트는 동일한 버전의 hello 응용 프로그램으로 요청을 보냅니다.
kind: Service
apiVersion: v1
metadata:
name: "hello"
spec:
sessionAffinity: ClientIP
selector:
app: "hello"
ports:
- protocol: "TCP"
port: 80
targetPort: 80
Clean up
이제 Canary deployment가 제대로 작동하는지 확인 했으므로 이제 Canary deployment와 삭제된 서비스를 삭제할 수 있습니다.
$ kubectl delete deployment hello-canary
Canary deployment와 실제 환경에서 새 버전의 application을 테스트 하는 방법을 배웠습니다.
Blue-green deployments
Rolling 업데이트는 최소한의 오버 헤드, 최소한의 성능 영향 및 최소한의 중단 시간으로 천천히 응용 프로그램을 배포 할 수 있기 때문에 이상적입니다. 로드 밸런서(load balancer)가 완전히 배포된 후에만 새 버전을 가리 키도록 로드 밸런서를 수정하는 것이 유익한 경우가 있습니다. 이 경우 Blue-green deployment가 필요합니다.
Kubernetes는 두 가지 별도의 배포를 만들어 이를 수행합니다. 하나는 이전의 "Blue" 버전용이고 다른 하나는 새로운 "Green" 버전 용입니다. "Blue" 버전에는 기존 hello 배포를 사용하십시오. 배치는 라우터 역할을하는 서비스를 통해 액세스됩니다. 새로운 "Green"버전이 실행되면 서비스를 업데이트하여 해당 버전을 사용하도록 전환합니다.
Blue-green deployment의 주요 단점은 응용 프로그램을 호스팅하는 데 필요한 최소한 2배의 리소스(resource)가 클러스터에 있어야한다는 것입니다. 한 번에 두 버전의 응용 프로그램을 배포(deployment)하기 전에 클러스터(cluster)에 충분한 리소스가 있는지 확인합니다.
The Service
기존 hello 서비스를 사용하지만 Selector에 app : hello, version : 1.0.0 이 있도록 업데이트하십시오. Selector는 기존의 "Blue" deployment와 일치합니다. 그러나 다른 버전을 사용하기 때문에 "Green" deployment와 일치하지 않습니다.
먼저 서비스를 업데이트하십시오.
$ kubectl apply -f services/hello-blue.yaml
Updating using Blue-Green Deployment
Blue-green deployment 스타일을 지원하기 위해 새로운 버전의 새로운 "green" deployment를 작성합니다. green deployment는 버전 레이블과 이미지 경로를 업데이트합니다.
$ cat deployments/hello-green.yaml
apiVersion: extensions/v1beta1
kind: Deployment
metadata:
name: hello-green
spec:
replicas: 3
template:
metadata:
labels:
app: hello
track: stable
version: 2.0.0
spec:
containers:
- name: hello
image: kelseyhightower/hello:2.0.0
ports:
- name: http
containerPort: 80
- name: health
containerPort: 81
resources:
limits:
cpu: 0.2
memory: 10Mi
livenessProbe:
httpGet:
path: /healthz
port: 81
scheme: HTTP
initialDelaySeconds: 5
periodSeconds: 15
timeoutSeconds: 5
readinessProbe:
httpGet:
path: /readiness
port: 81
scheme: HTTP
initialDelaySeconds: 5
timeoutSeconds: 1
“Green” deployment를 생성합니다.
$ kubectl create -f deployments/hello-green.yaml
green deployment가 있고 제대로 시작된 경우 현재 1.0.0 버전이 아직 사용되고 있는지 확인하십시오.
$ curl -ks https://`kubectl get svc frontend -o=jsonpath="{.status.loadBalancer.ingress[0].ip}"`/version
새로운 버전을 가르키도록 서비스를 업데이트 합니다.
$ kubectl apply -f services/hello-green.yaml
서비스가 업데이트되면 즉시 “Green” deployment가 사용됩니다. 이제 새 버전이 항상 사용되고 있는지 확인할 수 있습니다.
$ curl -ks https://`kubectl get svc frontend -o=jsonpath="{.status.loadBalancer.ingress[0].ip}"`/version
Blue-Green Rollback
필요한 경우 같은 방법으로 이전 버전으로 Rollback 할 수 있습니다. "Blue" deployment가 아직 실행 중이지만 서비스를 이전 버전으로 다시 업데이트하면됩니다.
$ kubectl apply -f services/hello-blue.yaml
일단 서비스를 업데이트하면 Rollback이 성공적으로 완료됩니다. 다시 올바른 버전이 사용되고 있는지 확인하십시오.
$ curl -ks https://`kubectl get svc frontend -o=jsonpath="{.status.loadBalancer.ingress[0].ip}"`/version
훌륭합니다. 지금까지 Kubernetes를 통해 업데이트 배포하는 방법에 대해 배웠습니다.
'Google Cloud Platform' 카테고리의 다른 글
| Google Cloud Platform 이용한 텍스트 카테고리 분류 Natural Language API (1) | 2018.04.10 |
|---|---|
| Google Cloud ML Vision API를 이용한 이미지 텍스트 추출 그리고 번역을 위한 Translation API와 Natural Language API (1) | 2018.04.10 |
| Jenkins Kubernetes Google Cloud (2) | 2018.04.01 |
| Docker Hadoop 클러스터 Hive 설치 (0) | 2018.03.28 |
| Orchestrating Google Cloud with Kubernetes (0) | 2018.03.12 |