Google Cloud ML Engine
Google Cloud ML Vision API를 이용한 이미지 텍스트 추출 그리고 번역을 위한 Translation API와 Natural Language API
첫 링크 글에서 API_KEY Set up을 따라하면서 진행해주세요!
Google Cloud Platform 이용한 텍스트 카테고리 분류 Natural Language API
Google Cloud Platform Cloud Vision API를 이용한 이미지, 얼굴 Detection
Google Cloud Platform 이용한 엔티티와 감정 분석 Natural Language API

dataset 준비
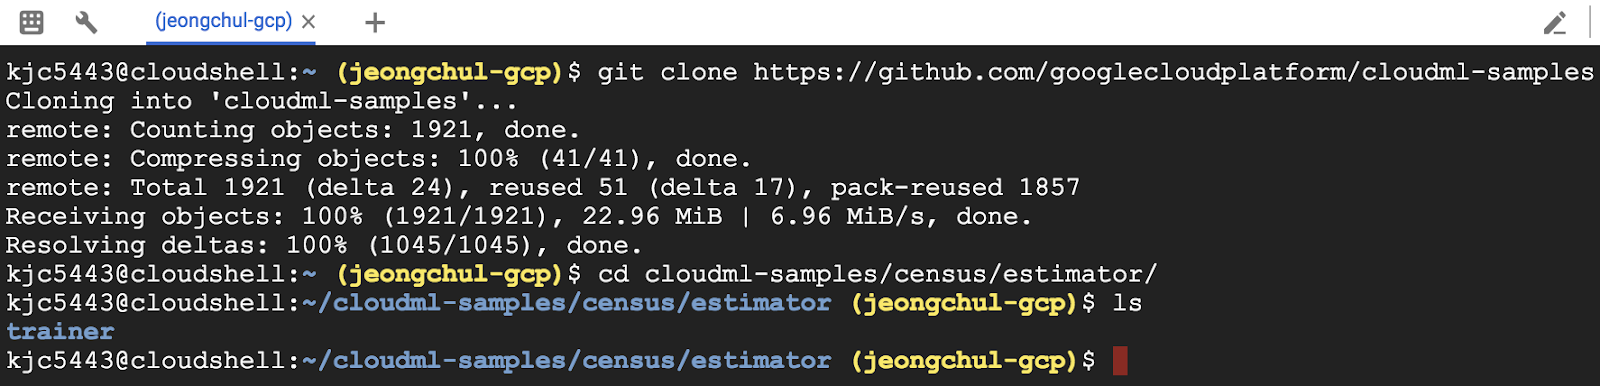
실습을 진행하기 위해서 Cloud shell에서 Github repository를 가져옵니다.
$ git clone https://github.com/googlecloudplatform/cloudml-samples
$ cd cloudml-samples/census/estimator
Google Cloud Storage bucket에 있는 adult.data와 adult.test 데이터 파일을 가져옵니다. 우리는 Cloud Storage로부터 파일을 local 환경으로 복사하거나 바로 읽어올 수 있습니다. 우리는 샘플 파일을 다운로드하고, Cloud Storage bucket으로부터 업로드할 것입니다.
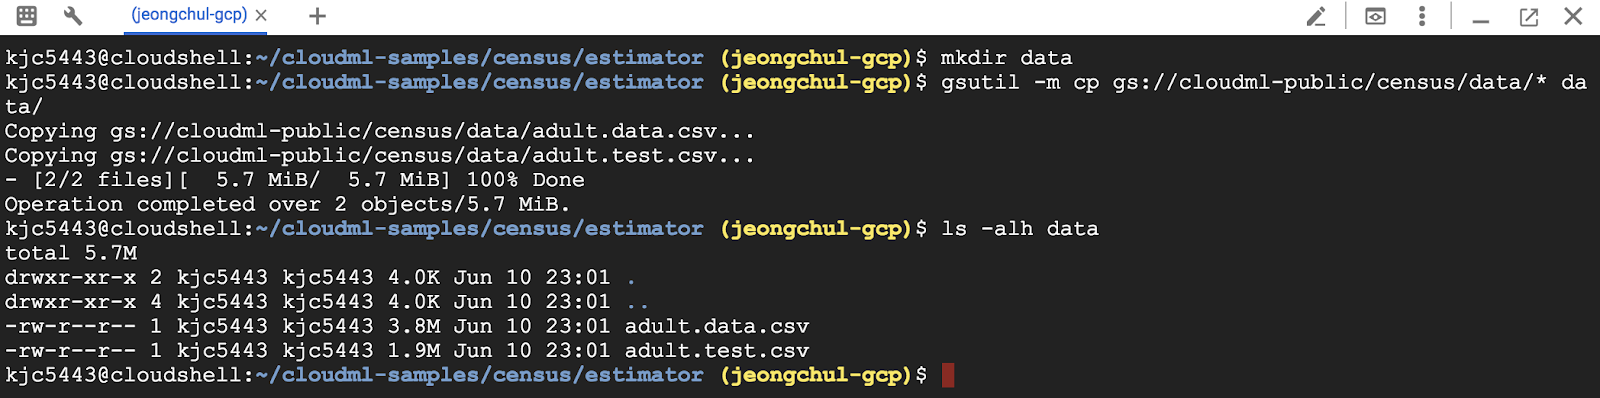
data라는 디렉토리를 만들고 그 곳에 gsutil 이라는 명령어를 통해 가져옵니다.
$ mkdir data
$ gsutil -m cp gs://cloudml-public/census/data/* data/
$ ls -alh data
환경 변수 TRAIN_DATA와 EVAL_DATA 변수로 경로(path)를 설정합니다.
$ TRAIN_DATA=$(pwd)/data/adult.data.csv
$ EVAL_DATA=$(pwd)/data/adult.test.csv
$ echo $TRAIN_DATA
$ echo $EVAL_DATA

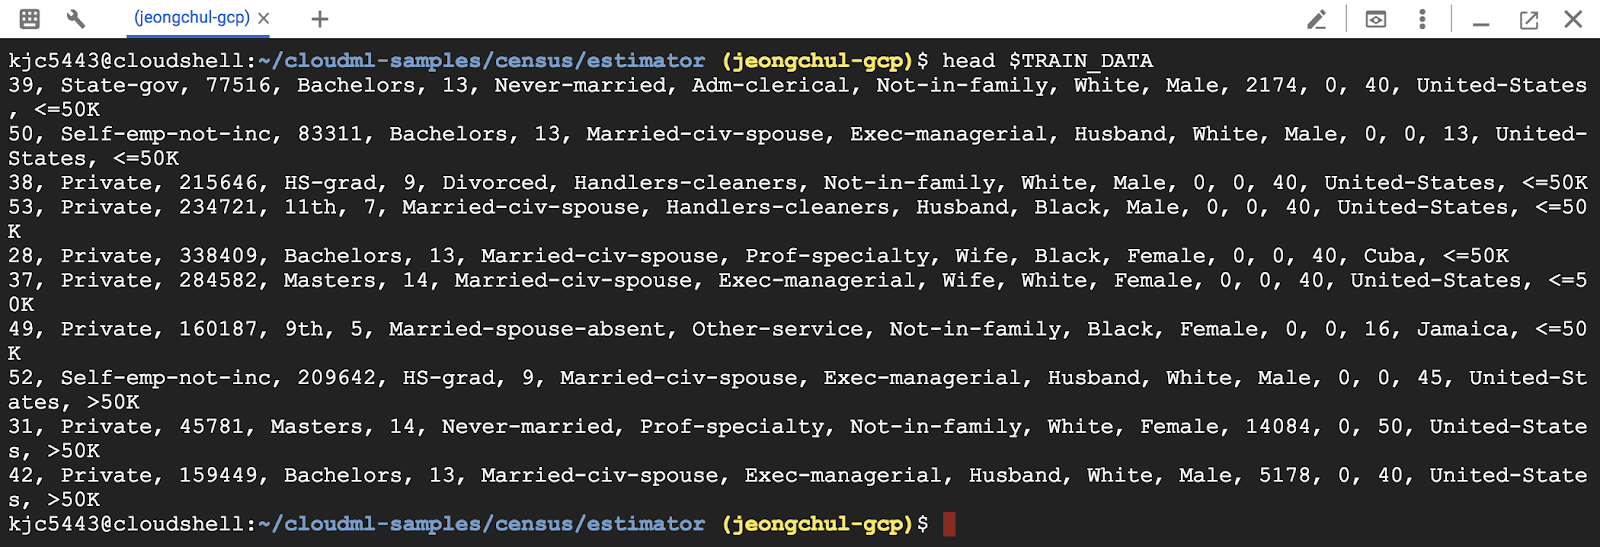
adult.data.csv 파일을 확인해봅시다. csv파일은 comma로 구분되어 있습니다.
$ head $TRAIN_DATA
Tensorflow 설치
우리의 ML 모델을 Tensorflow을 이용해 학습 시킬 것입니다.
tensorflow를 설치해봅시다.
$ sudo pip install tensorflow==1.4.1

Local trainer로 학습 진행하기
local trainer는 Python 코드로 구현된 모델 학습이 가능 프로그램입니다. training process를 시작하기 위해 환경 변수를 입력합니다.
학습시키기 위한 모델의 코드를 살펴봅시다.
$ vi trainer/model.py

코드를 살펴봅시다.
# Define the format of your input data including unused columns
CSV_COLUMNS = ['age', 'workclass', 'fnlwgt', 'education', 'education_num',
'marital_status', 'occupation', 'relationship', 'race', 'gender',
'capital_gain', 'capital_loss', 'hours_per_week',
'native_country', 'income_bracket']
데이터셋의 column이 정의되어 있습니다.
CSV_COLUMN_DEFAULTS = [[0], [''], [0], [''], [0], [''], [''], [''], [''], [''],
[0], [0], [0], [''], ['']]
column의 default값을 정해놓았습니다. int, float 형 column은 0이며 string(문자열)형 column은 ‘’공백입니다.
LABEL_COLUMN = 'income_bracket'
LABELS = [' <=50K', ' >50K']
분류해야 할 Label(class)는 2개로 이진 분류 문제입니다. 최종 예측은 수입으로, 수입이 50K 초과하는지, 50K 이하인지 분류합니다.
# Define the initial ingestion of each feature used by your model.
# Additionally, provide metadata about the feature.
INPUT_COLUMNS = [
# Categorical base columns
# For categorical columns with known values we can provide lists
# of values ahead of time.
tf.feature_column.categorical_column_with_vocabulary_list(
'gender', [' Female', ' Male']),
tf.feature_column.categorical_column_with_vocabulary_list(
'race',
[' Amer-Indian-Eskimo', ' Asian-Pac-Islander',
' Black', ' Other', ' White']
),
tf.feature_column.categorical_column_with_vocabulary_list(
'education',
[' Bachelors', ' HS-grad', ' 11th', ' Masters', ' 9th',
' Some-college', ' Assoc-acdm', ' Assoc-voc', ' 7th-8th',
' Doctorate', ' Prof-school', ' 5th-6th', ' 10th',
' 1st-4th', ' Preschool', ' 12th']),
tf.feature_column.categorical_column_with_vocabulary_list(
'marital_status',
[' Married-civ-spouse', ' Divorced', ' Married-spouse-absent',
' Never-married', ' Separated', ' Married-AF-spouse', ' Widowed']),
tf.feature_column.categorical_column_with_vocabulary_list(
'relationship',
[' Husband', ' Not-in-family', ' Wife', ' Own-child', ' Unmarried',
' Other-relative']),
tf.feature_column.categorical_column_with_vocabulary_list(
'workclass',
[' Self-emp-not-inc', ' Private', ' State-gov',
' Federal-gov', ' Local-gov', ' ?', ' Self-emp-inc',
' Without-pay', ' Never-worked']
),
# For columns with a large number of values, or unknown values
# We can use a hash function to convert to categories.
tf.feature_column.categorical_column_with_hash_bucket(
'occupation', hash_bucket_size=100, dtype=tf.string),
tf.feature_column.categorical_column_with_hash_bucket(
'native_country', hash_bucket_size=100, dtype=tf.string),
문자열을 학습시키기 위해서는 categorical 데이터로 변환해줘야 합니다.
# Continuous base columns.
tf.feature_column.numeric_column('age'),
tf.feature_column.numeric_column('education_num'),
tf.feature_column.numeric_column('capital_gain'),
tf.feature_column.numeric_column('capital_loss'),
tf.feature_column.numeric_column('hours_per_week'),
column이 int, float 임을 정의합니다.
]
UNUSED_COLUMNS = set(CSV_COLUMNS) - {col.name for col in INPUT_COLUMNS} - \
{LABEL_COLUMN}
Training에는 사용되지 않는 column을 정의합니다.
def build_estimator(config, embedding_size=8, hidden_units=None):
"""Build a wide and deep model for predicting income category.
여기서 사용되는 모델은 wide and deep 모델 입니다. https://www.tensorflow.org/tutorials/wide_and_deep
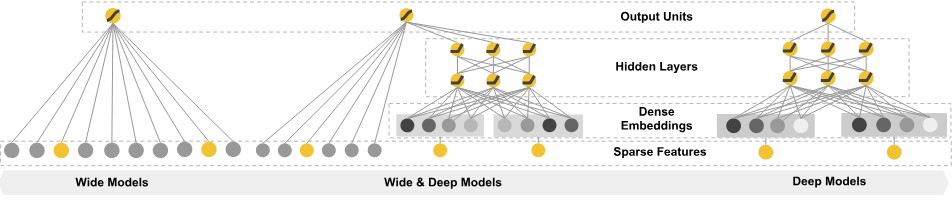
Wide and deep models use deep neural nets to learn high level abstractions
about complex features or interactions between such features.
These models then combined the outputs from the DNN with a linear regression
performed on simpler features. This provides a balance between power and
speed that is effective on many structured data problems.
You can read more about wide and deep models here:
https://research.googleblog.com/2016/06/wide-deep-learning-better-together-with.html
To define model we can use the prebuilt DNNCombinedLinearClassifier class,
and need only define the data transformations particular to our dataset, and
then
assign these (potentially) transformed features to either the DNN, or linear
regression portion of the model.
Args:
config: tf.contrib.learn.RunConfig defining the runtime environment for the
estimator (including model_dir).
embedding_size: int, the number of dimensions used to represent categorical
features when providing them as inputs to the DNN.
hidden_units: [int], the layer sizes of the DNN (input layer first)
learning_rate: float, the learning rate for the optimizer.
Returns:
A DNNCombinedLinearClassifier
"""
(gender, race, education, marital_status, relationship,
workclass, occupation, native_country, age,
education_num, capital_gain, capital_loss, hours_per_week) = INPUT_COLUMNS
# Build an estimator.
# Reused Transformations.
# Continuous columns can be converted to categorical via bucketization
age_buckets = tf.feature_column.bucketized_column(
age, boundaries=[18, 25, 30, 35, 40, 45, 50, 55, 60, 65])
age에 대해 boundary를 지정합니다.
# Wide columns and deep columns.
wide_columns = [
# Interactions between different categorical features can also
# be added as new virtual features.
tf.feature_column.crossed_column(
['education', 'occupation'], hash_bucket_size=int(1e4)),
tf.feature_column.crossed_column(
[age_buckets, race, 'occupation'], hash_bucket_size=int(1e6)),
tf.feature_column.crossed_column(
['native_country', 'occupation'], hash_bucket_size=int(1e4)),
gender,
native_country,
education,
occupation,
workclass,
marital_status,
relationship,
age_buckets,
]
wide network로 학습될 column을 정의합니다.
deep_columns = [
# Use indicator columns for low dimensional vocabularies
tf.feature_column.indicator_column(workclass),
tf.feature_column.indicator_column(education),
tf.feature_column.indicator_column(marital_status),
tf.feature_column.indicator_column(gender),
tf.feature_column.indicator_column(relationship),
tf.feature_column.indicator_column(race),
deep network으로 학습될 column을 정의합니다.
# Use embedding columns for high dimensional vocabularies
tf.feature_column.embedding_column(
native_country, dimension=embedding_size),
tf.feature_column.embedding_column(occupation, dimension=embedding_size),
age,
education_num,
capital_gain,
capital_loss,
hours_per_week,
]
DNNLinearClaissifer 분류기 모델을 정의합니다.
return tf.estimator.DNNLinearCombinedClassifier(
config=config,
linear_feature_columns=wide_columns,
dnn_feature_columns=deep_columns,
dnn_hidden_units=hidden_units or [100, 70, 50, 25]
)
자 이제 모델을 학습하기 위해서 환경 변수를 설정합니다.
$ MODEL_DIR=$(pwd)/output
$ echo $MODEL_DIR

자 이제 gcloud ml-engine을 통해서 local에서 training job을 실행해봅시다.
$ gcloud ml-engine local train \
--module-name trainer.task \
--package-path trainer/ \
-- \
--train-files $TRAIN_DATA \
--eval-files $EVAL_DATA \
--train-steps 1000 \
--job-dir $MODEL_DIR \
--eval-steps 100

모델에 대한 정확도(accuracy) metric을 확인할 수 있습니다.

default로 verbose logging은 꺼져있는 상태입니다. log를 살펴보기 위해서는 --verbosity DEBUG 옵션을 추가해야 합니다.
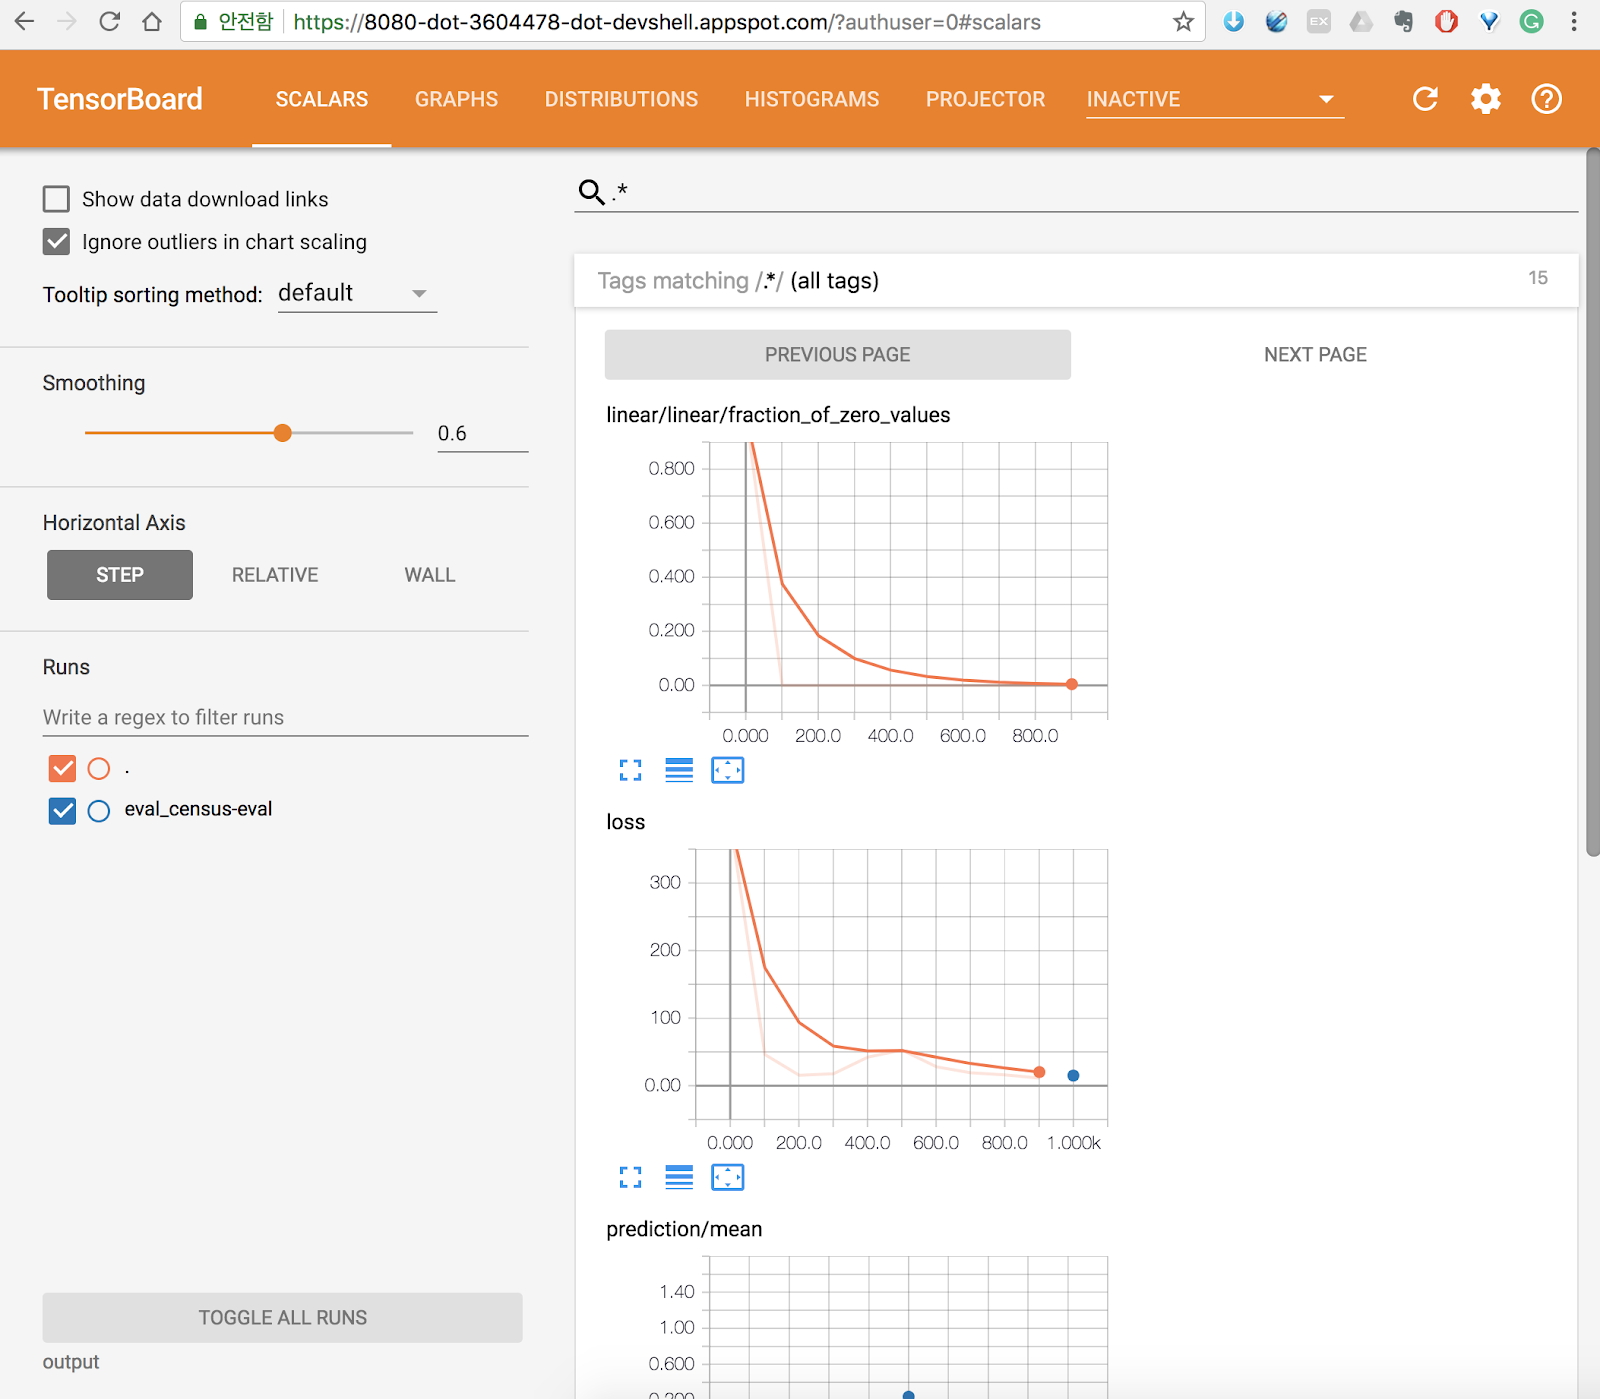
Tensorboard
자 training에서 실행된 summary 요약 정보를 살펴봅시다.
$ tensorboard --logdir=output --port=8080

포트에서 미리보기 8080 버튼을 클릭합니다.

tensorboard를 살펴볼 수 있습니다.

정지하기 위해서는 ctrl+c 버튼을 클릭하면 됩니다.
학습된 모델 예측하기
학습된 모델에 test 데이터를 예측해봅시다. test.json 은 census 디렉토리에 있습니다.
우선 학습된 모델을 살펴봅시다. 모델의 이름은 생성된 시간으로 timestamp 디렉토리 안에 있습니다.
$ ls output/export/census/

자 이제 test 데이터를 모델을 통해서 예측해봅시다.
$ gcloud ml-engine local predict \
--model-dir output/export/census/<timestamp> \
--json-instances ../test.json
결과는 다음과 같습니다.

클래스는 0으로 수입이 50K 이하로 예측되었습니다. 클래스가 1이라면 수익이 50K 초과입니다.
cloud에서 training job 실행하기
자 이제 cloud에서 Cloud ML Engine을 이용해 train을 실행해봅시다.
Cloud ML Engine은 Google Cloud Storage(GCS) 접근을 필요로 합니다.
Model을 학습하고 예측하는 동안 GCS로부터 데이터를 읽고 씁니다.
다음의 환경변수를 설정합니다.
$ PROJECT_ID=$(gcloud config list project --format "value(core.project)")
$ BUCKET_NAME=${PROJECT_ID}-mlengine
$ echo $BUCKET_NAME
$ REGION=us-central1

bucket을 생성해봅시다.
$ gsutil mb -l $REGION gs://$BUCKET_NAME

데이터셋 파일을 Cloud Storage bucket에 업로드 해봅시다.
$ gsutil cp -r data gs://$BUCKET_NAME/data
TRAIN_DATA와 EVAL_DATA 환경 변수를 Cloud Storage Bucket으로 설정합니다.
$ TRAIN_DATA=gs://$BUCKET_NAME/data/adult.data.csv
$ EVAL_DATA=gs://$BUCKET_NAME/data/adult.test.csv

cloud의 단일 머신(single instance)에서 실행하기
training job의 이름을 설정하고 OUTPUT_PATH 환경 변수를 설정합니다.
$ JOB_NAME=jc_census1
$ OUTPUT_PATH=gs://$BUCKET_NAME/$JOB_NAME
$ echo $OUTPUT_PATH

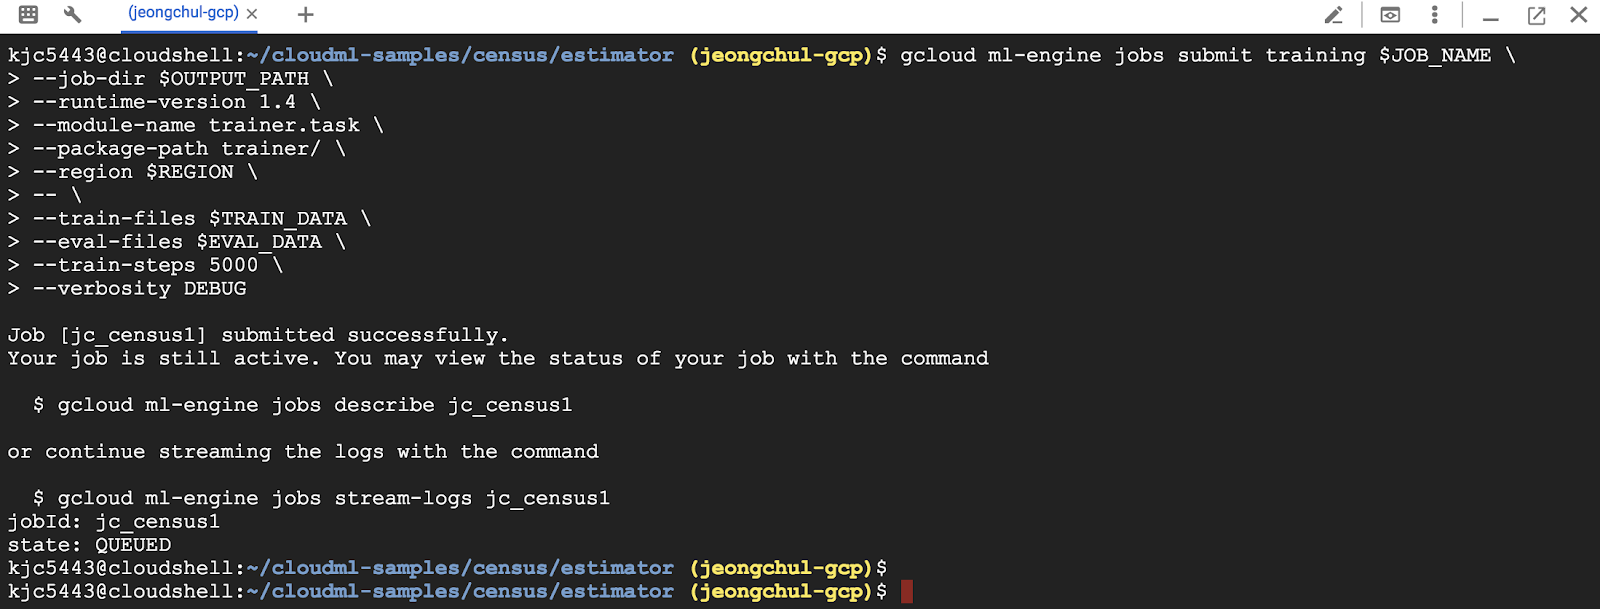
이제 cloud에서 training job을 실행해봅시다. --verbosity DEBUG로 설정하여 로깅 출력을 확인하고 accuracy와 loss 그리고 다른 metric을 살펴봅시다.
$ gcloud ml-engine jobs submit training $JOB_NAME \
--job-dir $OUTPUT_PATH \
--runtime-version 1.4 \
--module-name trainer.task \
--package-path trainer/ \
--region $REGION \
-- \
--train-files $TRAIN_DATA \
--eval-files $EVAL_DATA \
--train-steps 5000 \
--verbosity DEBUG
중간에 API 사용 설정을 위해 enable and retry에서 y를 입력하고 enter 버튼을 누릅니다.
Cloud Storage 접근 권한 에러가 발생한다면 IAM로 이동해 역할에 Cloud Storage에 대한 접근 권한 설정을 진행해야 합니다.
IAM 및 관리자 버튼을 클릭합니다.

Google API 서비스 계정에서 역할에 대한 상속(연필 모양) 버튼을 클릭합니다.

저장소 관리자 역할을 추가하고 저장 버튼을 클릭합니다.

job을 submit하고 training job에 대한 로그를 살펴봅시다.
$ gcloud ml-engine jobs stream-logs $JOB_NAME

실행된 job은 Big data 섹션에서 ML Engine > Jobs 로 이동해 살펴볼 수 있습니다.

로그 보기를 통해 확인할 수 있습니다.
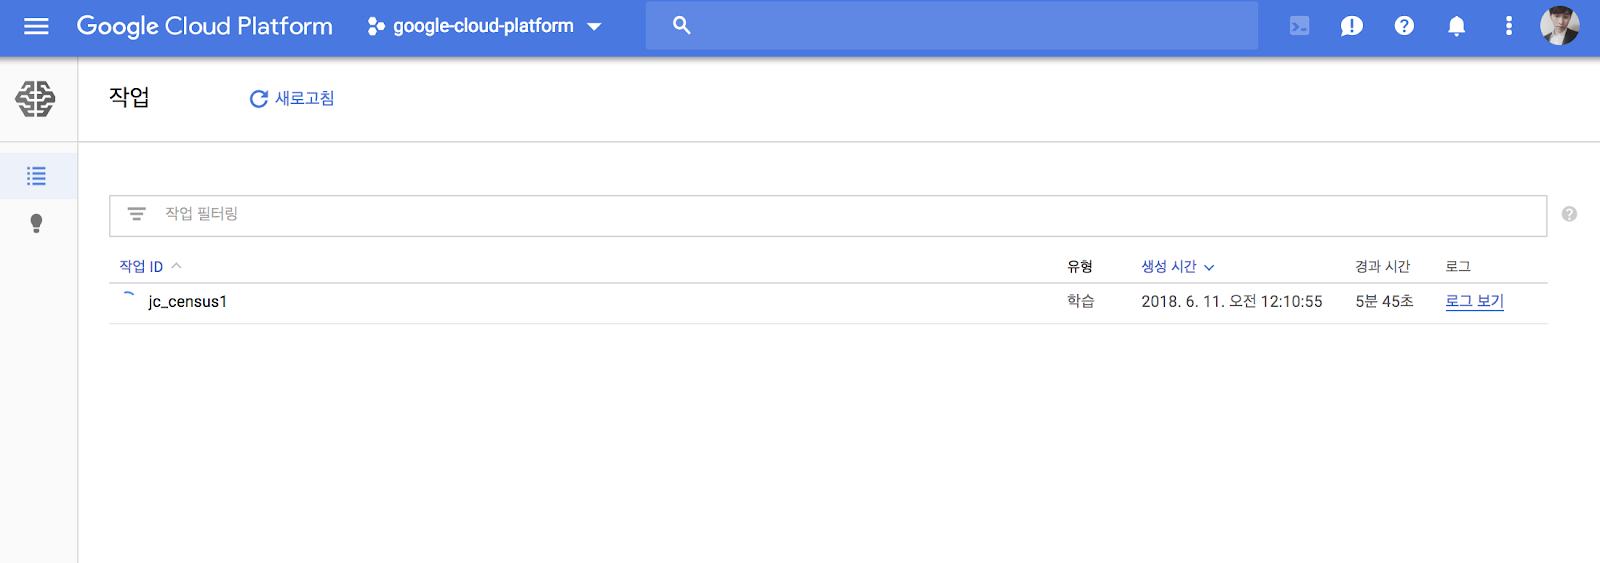

작업이 완료된 것을 확인합니다.

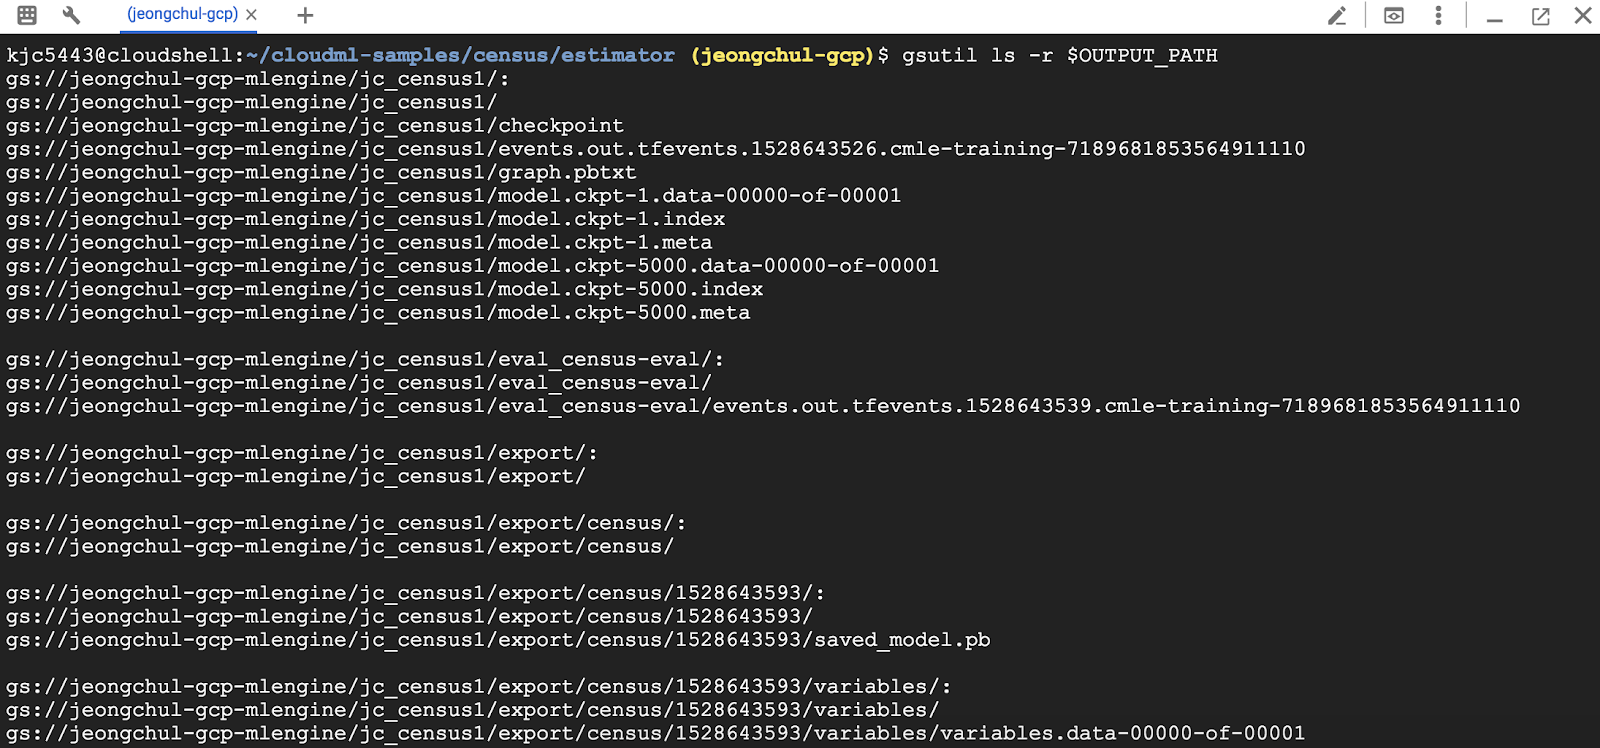
생성된 모델을 확인해봅시다.
$ gsutil ls -r $OUTPUT_PATH
tensorboard를 실행해봅시다.
$ tensorboard --logdir=$OUTPUT_PATH --port=8080

웹 프리뷰에서 포트 8080 미리 보기 버튼을 클릭합니다.

클라우드로부터 예측 request를 모델로 전송 배포하기
클라우드로 온라인 예측 요청을 처리하도록 진행해봅시다.
환경 변수를 설정합니다.
$ MODEL_NAME=census
$ gcloud ml-engine models create $MODEL_NAME --regions=$REGION

모델을 사용하기 위해 export를 확인합니다.

$OUTPUT_PATH/export/census/<timestamp>/를 복사합니다.
환경 변수로 MODEL_BINARIES를 저장합니다.
$ MODEL_BINARIES=$OUTPUT_PATH/export/census/<timestamp>/

모델을 deploy 해봅시다.
$ gcloud ml-engine versions create v1 \
--model $MODEL_NAME \
--origin $MODEL_BINARIES \
--runtime-version 1.4

모델의 리스트를 확인해보기 위해서는 다음의 명령어를 사용합니다.
$ gcloud ml-engine models list

모델의 테스트를 test.json을 이용해 진행해봅시다.
$ gcloud ml-engine predict \
--model $MODEL_NAME \
--version v1 \
--json-instances ../test.json

결과는 위와 동일함을 알 수 있습니다.
distributed 분산 학습
https://cloud.google.com/ml-engine/docs/tensorflow/concepts
사이트에서 Using Distributed TensorFlow with Cloud Datalab 섹션을 확인합니다.
이번 포스팅은 여기까지 진행하겠습니다.
'Google Cloud Platform' 카테고리의 다른 글
| [Google Cloud Platform] macOS gcloud CLI 설치 (0) | 2022.07.30 |
|---|---|
| Google Cloud ML TensorFlow를 활용한 Object Detection (2) | 2018.06.15 |
| Google Cloud Platform 이용한 엔티티와 감정 분석 Natural Language API (0) | 2018.06.05 |
| MapReduce 프로그래밍(Hadoop) using GCP DataProc (1) | 2018.06.04 |
| MongoDB using Google Cloud Platform (1) | 2018.06.03 |